How to Create Draggable HTML Elements With JavaScript
Dragging HTML elements around the screen is not possible with the native Drag and Drop API. However, it can still be achieved using regular JavaScript event listeners. In this tutorial, we'll take a look at how we can create a draggable HTML element with JavaScript that can be dragged anywhere. By the end, we'll have the following functionality ready for us to use in future projects:

Creating the HTML and CSS
First, we need to create the HTML layout, and we'll also need to apply some CSS rules to the element. We need the element to be absolutely positioned, as we'll update its top and left positions to make it follow the cursor. Create the following HTML with these styles applied:
<span class="draggable">🍪</span>
<style>
    .draggable {
        position: absolute;
	user-select: none;
        cursor: grab;
	font-size: 21px;
    }

    .draggable:active {
        cursor: grabbing;
    }
</style>Apart from positioning it absolutely, we also want to apply the following CSS rules to indicate that the element is interactive:
user-select: Settinguser-selecttononeprevents users from selecting the element as text. This prevents accidental selections for an element that should only be draggable.cursor: By setting the cursor tograb, and setting it forgrabbingon theactivestate, we can visually indicate to users that the element can be grabbed, and the cursor icon will change during the dragging phase.
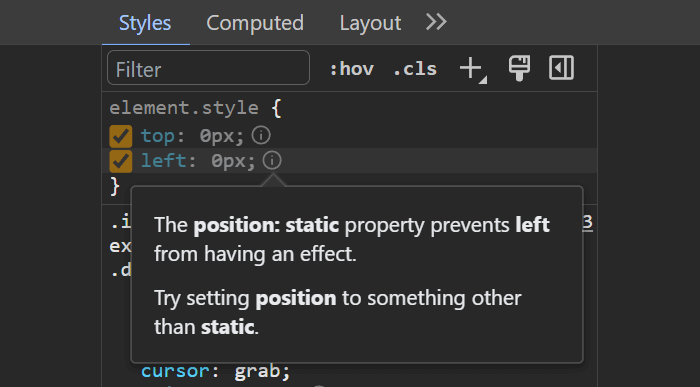
absolute positioning, top and left will not be appliedAdding JavaScript Event Listeners
Now that we have the element, we can add the event listener through JavaScript. We need to use the following three event listeners:
| Event listener | Purpose |
|---|---|
onmousedown | Grabs the initial position of the element |
onmousemove | Updates the element's position on drag |
onmouseup | Removes existing event listeners when the mouse button is released |
With these three event listeners, we'll have three stages for the event: grabbing, dragging, and releasing. To get the initial position of the draggable element, add the following JavaScript code:
const element = document.querySelector('.draggable')
const position = {
    x: 0,
    y: 0
}

element.onmousedown = event => {
    position.x = event.clientX
    position.y = event.clientY
}First, we grab the element using a querySelector. To store the positions, we can create a position object with x and y properties, each initially set to zero. When the element is clicked, the onmousedown event is triggered. This is when we need to assign the correct initial values to the position object using event.clientX and event.clientY.
event.clientX and event.clientY returns the mouse's position relative to the viewport, where clientX represents the horizontal position, and clientY represents the vertical.
Updating the element's position
Inside the callback of the onmousedown event listener, we want to attach an onmousemove event to the document itself. This will be triggered when we move the mouse around and will update the element's position.
document.onmousemove = documentEvent => {
    const x = position.x - documentEvent.clientX
    const y = position.y - documentEvent.clientY

    position.x = documentEvent.clientX
    position.y = documentEvent.clientY

    element.style.top = element.offsetTop - y + 'px'
    element.style.left = element.offsetLeft - x + 'px'
}First, we need to calculate the new x and y positions. This can be done by subtracting the element's position from the document's clientX and clientY properties. This ensures that the element stays under the cursor; otherwise, its position would offset with each drag.
After calculating the new positions, we need to update position.x and position.y with the new mouse positions. On the next iteration, these updated values will be used for the x and y variables. Lastly, to update the element's position, we can set the top and left CSS properties using offsetTop and offsetLeft, adjusted with the x and y variables.
offsetTop and offsetLeft return the element's position, relative to its parent.
Removing event listeners
Finally, we need to remove event listeners when the mouse button is released. We can do this using the onmouseup event listener. Add the following code after the onmousemove event listener to remove the events:
document.onmouseup = () => {
    document.onmouseup = null
    document.onmousemove = null
}This will reset the onmouseup and the onmousemove event listeners every time the mouse button is released. Without this, the element would keep following the mouse, even after we release the button.

Summary
Now you can use the draggable class inside your document to make an HTML element draggable. You can copy and play around with the full code in one piece using the following interactive example:
 index.js
 styles.css
 index.html
If you would like to learn more about working with JavaScript, we recommend checking out the following roadmap that takes you through various JavaScript projects to improve your coding skills. Thank you for reading, and happy coding! 🍪

 Access 100+ interactive lessons
- Unlimited access to hundreds of tutorials
- Prepare for technical interviews
Courses


Recommended

An Introduction to Urlcat
The Impact of Server-Side Rendering Vue.js Applications