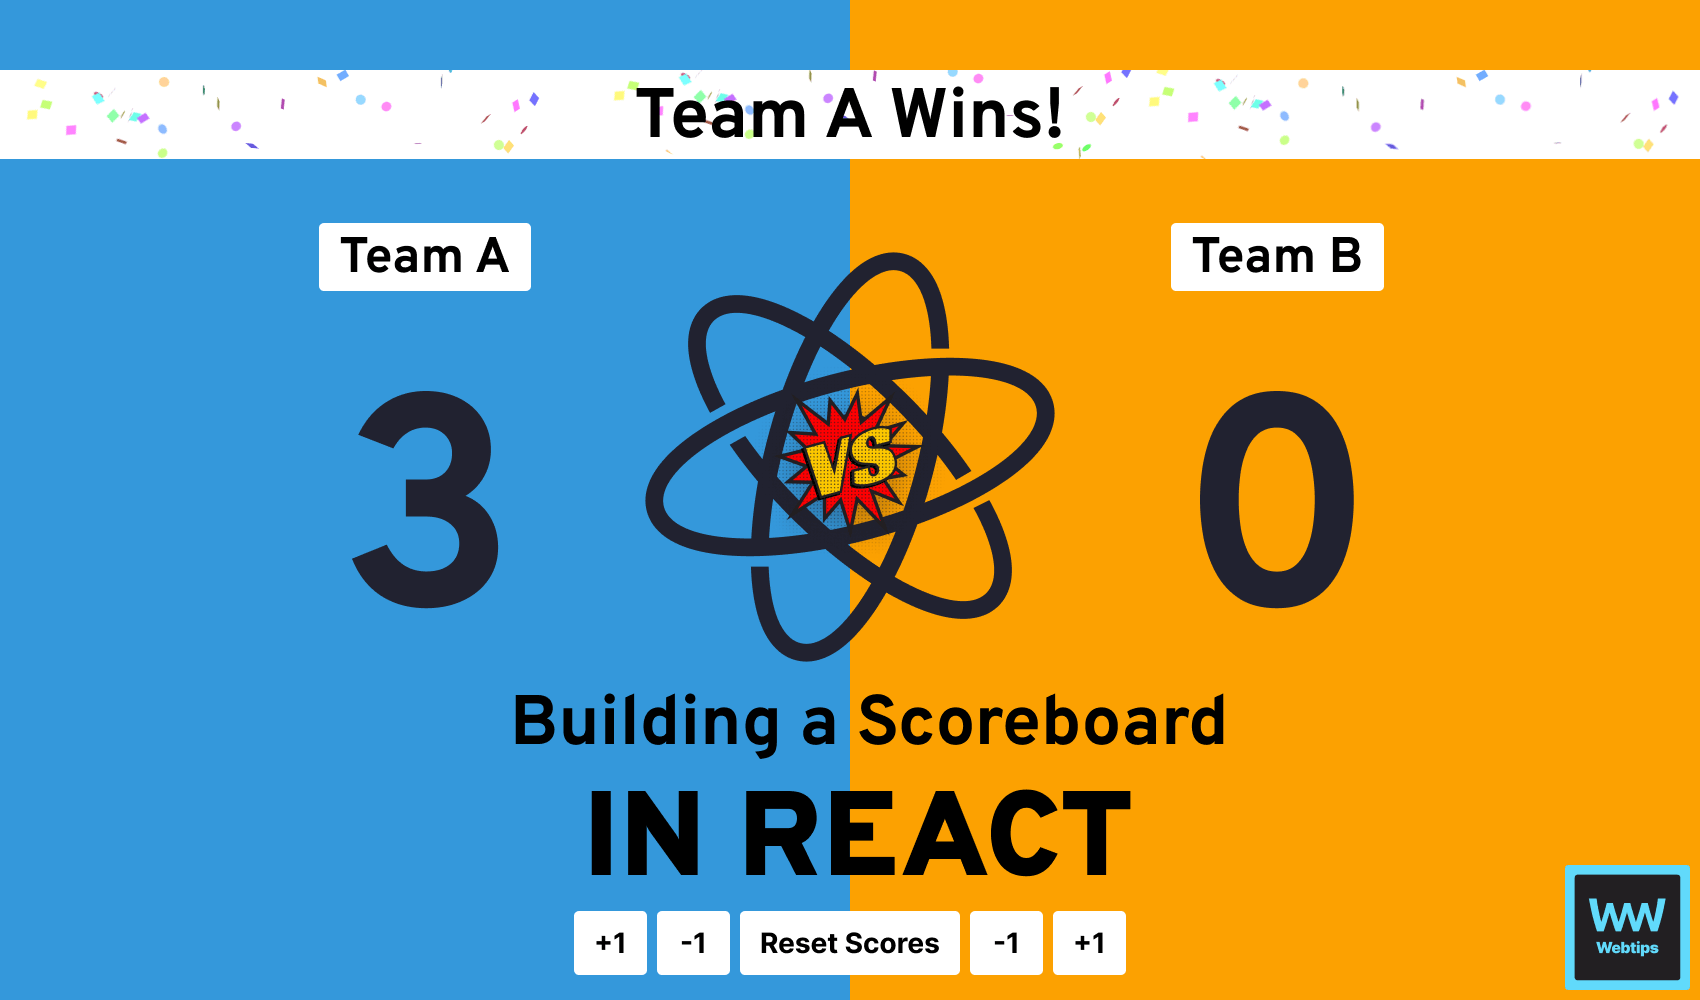
How to Build a Dynamic Scoreboard with React
In this tutorial, we'll guide you step by step through the process of creating a fully functional Scoreboard app from scratch. We'll cover essential concepts such as Node.js, NPM, React components, state management, event handling, and styling with CSS. By the end of this tutorial, you'll have a solid understanding of React development and be able to build your own web applications with confidence.
You can find the complete source code in one piece on Stackblitz.
Throughout the tutorial, we'll provide practical examples and detailed explanations to ensure you grasp each concept thoroughly. We'll start by setting up our development environment, installing React using Create React App, and exploring the project structure. Then, we'll dive into React components, understanding how to create functional and class components and manage dynamic data using state.
Once we have the foundation in place, we'll enhance the app's visual appeal with CSS styling, ensuring it displays well on various devices. We'll also add interactive features, like a reset button to clear scores and display winning or losing messages based on score comparisons. Finally, we'll prepare the app for production by optimizing its performance and deploying it using popular hosting platforms like Netlify or Vercel, making it accessible to users worldwide.

Node.js and NPM
Node.js is a runtime environment that allows developers to execute JavaScript code outside of a web browser. It's built on the V8 JavaScript engine from Chrome, providing a fast and efficient runtime for server-side applications.
One of the key advantages of Node.js is its non-blocking, event-driven architecture, which enables the handling of multiple connections simultaneously without creating new threads for each request. This makes it well-suited for building scalable, real-time applications.
npm (Node Package Manager) is a package manager for Node.js, serving as a vast repository of reusable libraries and modules. With npm, developers can easily install, manage, and share JavaScript packages, making it an essential tool for any JavaScript project. Whether it's utility functions, database connectors, or frontend frameworks like React, npm hosts an extensive collection of modules that streamline development processes and encourage code reusability.
To demonstrate the power of npm, let's install and utilize a popular library called lodash. Lodash is a utility library that provides a rich set of functions for working with arrays, objects, and other data structures. To install lodash in your project, open your terminal and run the following command:
npm install lodashOnce installed, you can use lodash functions in your JavaScript code. For instance, let's find the maximum value in an array using the max function from lodash:
const _ = require('lodash');

const numbers = [4, 9, 2, 7, 3, 6];
const maxNumber = _.max(numbers);

console.log('The maximum number is:', maxNumber); // Output: The maximum number is: 9 By leveraging npm and Lodash, you can access powerful functionality with minimal effort, enhancing the efficiency and maintainability of your JavaScript projects.
Installing React with Create React App
React.js is a widely used JavaScript library for building user interfaces. Before diving into React development, you need to set up your development environment.
The easiest way to do this is by using Create React App, a tool developed by the React team that automates the setup process and provides a pre-configured React project. To create a new React project with Create React App, follow these steps:
- Step 1: Install Create React App globally on your system (you only need to do this once):
npm install -g create-react-app- Step 2: Create a new React project:
npx create-react-app my-react-app. This command will generate a new folder calledmy-react-appwith all the necessary files and configurations for a basic React project. - Step 3: Navigate to the newly created project directory:
cd my-react-app - Step 4: Start the development server:
npm start
Once the server starts, you can open your browser and visit http://localhost:3000 to see your newly created React app in action.
The moment you use Create React App, you save valuable time on the initial setup, allowing you to focus on building amazing user interfaces using React's powerful capabilities.

The Project Structure
Create React App generates a well-organized project structure to help you easily manage your React application.
Understanding the core files and directories will enable you to navigate your project efficiently and make informed decisions while developing. Let's take a quick tour of the essential files and directories created by Create React App:
src: This directory contains the main source code of your React application. It includes the entry point fileindex.js, where the React components are rendered, andApp.js, the root component of your application.public: This directory holds static assets like HTML files and images. Theindex.htmlfile is the main HTML template where your React application is injected.node_modules: This directory contains all the dependencies installed via npm. You should avoid manually modifying this directory, as npm handles the package management for you.package.json: Thepackage.jsonfile is a crucial part of your project. It lists all the dependencies, scripts, and metadata about your project. It's also where you can add additional configurations, such as proxy settings or environment variables.package-lock.json: This file keeps track of the exact versions of the installed dependencies. It ensures that all team members have the same dependency versions, making your project consistent across different environments.
project
├─ node_modules
├─ public
├─ src
├─ package-lock.json
├─ package.jsonFamiliarizing yourself with the project structure and understanding the role of each file is essential for efficient React development. It allows you to make informed decisions, maintain a clean codebase, and collaborate effectively with other developers on your project.
Understanding Components and State
In React, components serve as the fundamental building blocks of your user interface. They encapsulate reusable pieces of code that handle specific functionalities or represent specific elements of your UI.
Components provide a modular approach to development, facilitating the management and maintenance of complex applications. React primarily features two types of components: functional and class components.
Functional components
Functional components are the simplest form of React components. They're JavaScript functions that accept props (short for properties) as input and return JSX (JavaScript XML) as output, defining the structure of the UI. Functional components are stateless, meaning they don't have their own internal state and rely solely on the props they receive from their parent component.
const ScoreDisplay = props => (
    <div>
        <h2>{props.team}</h2>
        <p>Score: {props.score}</p>
    </div>
)
Class Components
Class components are more feature-rich than functional components. They are defined as ES6 classes and extend the React.Component class. Class components have their own internal state, enabling them to manage dynamic data and trigger re-renders when the state changes. They also have lifecycle methods that provide control over the component's behavior during different stages of its lifecycle.
class Scoreboard extends React.Component {
    constructor(props) {
        super(props)

        this.state = {
            teamA: 0,
            teamB: 0
        }
    }

    render() {
        return (
            <div>
                <h1>Scoreboard</h1>
                <ScoreDisplay team="Team A" score={this.state.teamA} />
                <ScoreDisplay team="Team B" score={this.state.teamB} />
            </div>
        )
    }
}State and Its Role in Managing Dynamic Data
State is a fundamental concept in React that allows components to store and manage data that can change over time. Unlike props, which are passed down from parent to child components and are read-only, state is internal to the component and can be updated through the setState method.
When a component's state changes, React automatically triggers a re-render, updating the UI to reflect the most recent data.
In the example above, the Scoreboard class component uses state to manage the scores for Team A and Team B. The constructor initializes the state, and the render method displays the scores via the ScoreDisplay functional component. When a button is clicked to update the scores, the state is modified using setState, prompting React to automatically update the UI to reflect the changes.

Creating the Scoreboard Component
To begin creating the scoreboard component, we'll first set up its basic structure. In this example, we'll use a functional component to keep things simple. Open your code editor and create a new file called Scoreboard.js. Then, let's start with the following code:
import React from 'react'

const Scoreboard = () => {
    return (
        <div>
            {/* Scoreboard Content Goes Here */}
        </div>
    )
}

export default Scoreboard
Next, we'll add the visual representation of the scores and team names into the Scoreboard component. We'll use HTML elements and apply CSS to style the scoreboard. For this example, let's assume we have two teams: Team A and Team B.
import './Scoreboard.css' // Import the CSS file for styling

const Scoreboard = () => {
    return (
        <div className="scoreboard">
            <div className="team">
                <h2>Team A</h2>
                <p className="score">0</p>
                <div className="buttons">
                    {/* Buttons to update Team A's score will be added here */}
                </div>
            </div>
            <div className="team">
                <h2>Team B</h2>
                <p className="score">0</p>
                <div className="buttons">
                    {/* Buttons to update Team B's score will be added here */}
                </div>
            </div>
        </div>
    )
}Now, we need to create a separate CSS file to style the scoreboard. Create a new file called Scoreboard.css in the same folder as Scoreboard.js and add the following styles:
.scoreboard {
    display: flex;
    justify-content: space-around;
    background-color: #f1f1f1;
    padding: 20px;
    border-radius: 10px;
    box-shadow: 0 4px 8px rgba(0, 0, 0, 0.1);
}

.team {
    text-align: center;
    padding: 20px;
}

.score {
    font-size: 36px;
    font-weight: bold;
}

.buttons {
    margin-top: 10px;
}The use of subtle shadows and rounded borders on the scoreboard element adds depth and a modern touch to the design.
Updating Scores
To manage the state for scores and team names within the Scoreboard component, we'll use React's useState hook. The initial state will be set to default values for the scores of both Team A and Team B. As users interact with the buttons, the state will change, and the component will re-render to reflect the updated scores.
// Update the import to include `useState`
import React, { useState } from 'react'

const Scoreboard = () => {
    const [scoreA, setScoreA] = useState(0)
    const [scoreB, setScoreB] = useState(0)

    return (...)
}Next, we need to create event handlers that will update the scores when users interact with the buttons. We'll define functions like handleIncrementA, handleDecrementA, handleIncrementB, and handleDecrementB that will update the state using the setScoreA and setScoreB functions.
const handleIncrementA = () => setScoreA(scoreA + 1)
const handleDecrementA = () => setScoreA(scoreA - 1)
const handleIncrementB = () => setScoreB(scoreB + 1)
const handleDecrementB = () => setScoreB(scoreB - 1)

return (
    <div className="scoreboard">
        <div className="team">
            <h2>Team A</h2>
            <p className="score">{scoreA}</p>
            <div className="buttons">
                <button onClick={handleIncrementA}>+1</button>
                <button onClick={handleDecrementA}>-1</button>
            </div>
        </div>
        <div className="team">
            <h2>Team B</h2>
            <p className="score">{scoreB}</p>
            <div className="buttons">
                <button onClick={handleIncrementB}>+1</button>
                <button onClick={handleDecrementB}>-1</button>
            </div>
        </div>
    </div>
)When users click the buttons, the event handlers trigger, and the scores are updated using the setScoreA and setScoreB functions. React automatically re-renders the Scoreboard component whenever the state changes, displaying the updated scores on the UI.
For instance, when the handleIncrementA function is called after clicking the "+1" button for Team A, the state variable scoreA is updated by incrementing it by 1. The component re-renders with the updated scoreA value, displaying the new score on the UI.
You can get the full source code in one piece on Stackblitz with TypeScript types included.
The same applies to Team B when users click the buttons to update their scores. React's efficient re-rendering mechanism ensures that only the necessary parts of the UI are updated, optimizing performance.
By appropriately managing state and binding event handlers, you've successfully built an interactive scoreboard app using React. Users can now update the scores for both teams by clicking the buttons, and the component re-renders accordingly to reflect the changes.
Styling the Scoreboard
To make the scoreboard app visually appealing, we'll apply CSS styling to different components and elements. By applying styles to the scoreboard, team displays, and buttons, we can create an interface that is both attractive and user-friendly.
.team h2 {
    font-size: 20px;
    margin-bottom: 10px;
}

.buttons button {
    font-size: 16px;
    padding: 8px 12px;
    margin-right: 5px;
    border: none;
    border-radius: 5px;
    background-color: #007bff;
    color: #fff;
    cursor: pointer;
}

.buttons button:last-child {
    margin-right: 0;
}

.buttons button:hover {
    background-color: #0056b3;
}
In this CSS code, we've extended styling to cover the remaining elements. We've also customized the colors, font sizes, and layout to enhance the app's appearance.
A responsive design ensures that the scoreboard app adapts well to different devices and screen resolutions. We can achieve this by using media queries to adjust the layout and font sizes based on the screen size.
@media (max-width: 768px) {
    .scoreboard {
        flex-direction: column;
    }

    .team {
        margin-bottom: 20px;
    }
} In the above CSS, we've added a media query to target screen sizes with a maximum width of 768px, commonly used as the breakpoint for mobile devices. As the screen width reaches or goes below this threshold, the scoreboard will switch to a vertical layout, stacking the team displays on top of each other. Additionally, we've introduced some margin to the bottom of the team displays, creating a more spacious appearance on smaller screens.
By using CSS to create an appealing visual design and implementing responsive design techniques, the scoreboard app will maintain its great appearance across a range of devices, including desktops, tablets, and mobile phones. Users can now interact with the scoreboard on different devices without compromising the user experience.
With these styling enhancements, your scoreboard app will not only be functional but also visually engaging, providing a polished and professional look.
Adding Interactive Features
Adding a reset button enables users to reset all scores to zero, providing a convenient way to start a new game or match. To achieve this functionality, we'll create a new event handler function called handleReset and a button to trigger it:
const Scoreboard = () => {
    // State declarations and handlers...

    const handleReset = () => {
        setScoreA(0)
        setScoreB(0)
    }

    return (
        <div className="scoreboard">
            ...
            <div className="reset-button">
                <button onClick={handleReset}>Reset Scores</button>
            </div>
        </div>
    )
}In the above code, we've added a new button labeled "Reset Scores." When the button is clicked, the handleReset function is invoked, setting the scores for Team A and Team B back to zero.
To display messages when a team wins or loses based on their scores, we'll use a conditional statement to compare the scores of Team A and Team B. We'll display messages like "Team A Wins!" or "Team B Wins!" when one team has a higher score, while "It's a Tie!" will be shown if both teams have the same score:
const Scoreboard = ({ teamAName, teamBName }) => {
    // State declarations and handlers...

    const getWinningMessage = () => {
        if (scoreA > scoreB) {
            return `${teamAName} Wins!`
        } else if (scoreB > scoreA) {
            return `${teamBName} Wins!`
        } else {
            return 'It\'s a Tie!'
        }
    }

    return (
        <div className="scoreboard">
            {/* ⚠️ Don't forget to replace the names with the props */}
            <h2>{teamAName}</h2>
            ...
            {/* After the reset button */}
            <div className="winning-message">
                {getWinningMessage()}
            </div>
        </div>
    )
}With the getWinningMessage function, we dynamically determine the winning or losing message based on the comparison of the scores. The message is then displayed in a dedicated div with the winning-message class.
Now, when users interact with the buttons to update the scores, the winning or losing message will be updated accordingly. If one team surpasses the other in score, the corresponding victory message will appear. In case of a tie, the message "It's a Tie!" will be displayed.
By integrating these interactive features, your scoreboard app becomes more engaging and user-friendly. Users can easily reset the scores and receive real-time feedback on the winning team, making the app more enjoyable to use during games or competitions.
Building the Scoreboard
Before deploying the app, we need to prepare it for production by optimizing its performance. This involves minimizing file sizes, reducing loading times, and ensuring that the app runs efficiently in a live environment.
To achieve this, we'll use a build tool like Create React App to generate a production-ready version of the app. Open your terminal and navigate to the root folder of your project. Run the following command to create a production build:
npm run buildThis command generates an optimized production build in the `build` folder of your project. Before deploying, it's essential to test the production build locally to ensure everything works as expected. To do this, you can use a static server to serve the build files. If you haven't already, install a static server globally:
npm install -g serveThen, run the following command to serve the production build: serve build. Visit your local host in your browser to test the production version of your app.
If you want to further optimize your app's assets, consider using tools like ImageOptim or SVGO to compress images and SVG files. Additionally, you can use minification tools for CSS and JavaScript files to reduce their sizes.
Deploying the App
To deploy your scoreboard app, you can use popular hosting platforms like Netlify or Vercel. Both platforms offer simple and straightforward deployment processes for static sites, making it easy to host your React app.
Deploying with Netlify:
- Sign up for a Netlify account and log in.
- Connect your code repository (GitHub, GitLab, or Bitbucket) to your Netlify account.
- Choose your project repository and configure the build settings. Set the build command to
npm run build, and the publish directory tobuild. - Click the "Deploy site" button to deploy your app. Netlify will automatically build and host your app.
Deploying with Vercel:
- Sign up for a Vercel account and log in.
- Import your code repository (GitHub, GitLab, or Bitbucket) to your Vercel account.
- Configure the build settings. Vercel should automatically detect Create React App and set the build command to
npm run build. - Click the "Deploy" button to deploy your app. Vercel will handle the build and deployment process.
Once your app is deployed, you'll receive a unique URL where your scoreboard app is accessible to the public. You can share this URL with others to showcase your app or use it in real-world scenarios.
 Access 100+ interactive lessons
- Unlimited access to hundreds of tutorials
- Prepare for technical interviews
Courses


Recommended
What are Arrow Functions in JavaScript?
How to Upload Files in React With Progress Tracking