7 Tips That Will Help You Get The Best Out Of Sass
Sass has been with us for ages. It first appear in 2006–13 years ago — and since then, it has come a long way. It put CSS on superpowers and pushed the way towards the next generation of CSS features.
Pre-processors introduced a new set of features to CSS by introducing a new syntax that compiles down to CSS.
According to the 2019 State of CSS survey, it still ranks as the number one preprocessor in awareness and interest.
Today, we will explore, how Sass remained strong, despite CSS starting to catch up a decade later. But before jumping in, let’s clarify an important thing that often causes confusion. What’s the difference between Sass and SCSS?
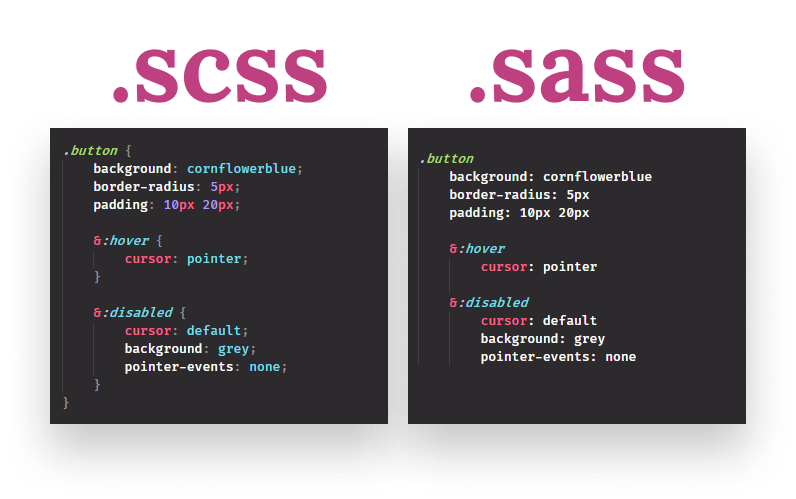
Sass vs SCSS
Originally, Sass used a .sass extension. It supports all the same features as .scss, except you use indentation — and no semicolons — as opposed to curly braces. Because of it’s similarity to .css, the .scss version became the most popular.

1. Nesting Selectors
One of Sass powers comes from the ability of nesting selectors. In CSS, you don’t have the option to organize your selectors into a tree structure. Everything is flat. This makes it hard to read large CSS files and differentiate which element belongs to which parent. Sass lets you nest these selectors into each other. The following example is the same set of CSS. One of them is nested, the other is not.
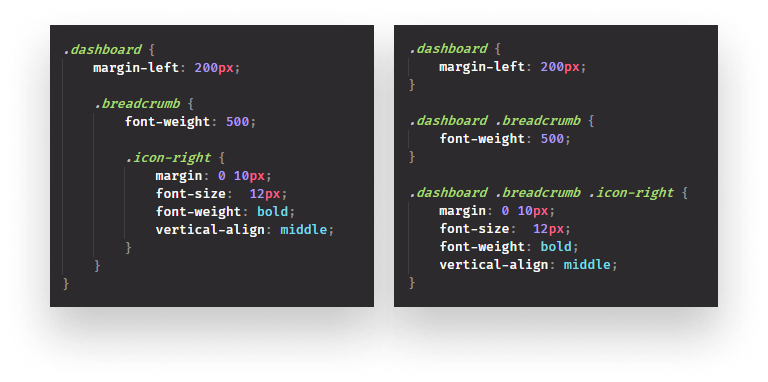
Although you should try to avoid deeply nested selectors at all costs, it is sometimes not feasible. You have a more clear view of what is happening when your selectors are nested.
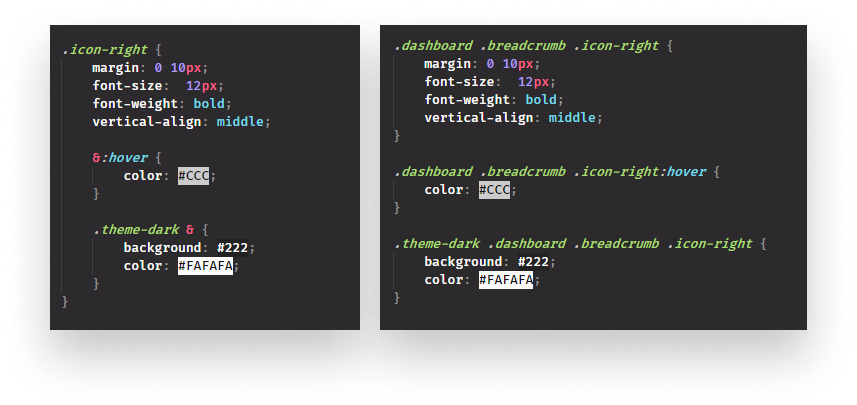
You also have the ability to easily:
- define styles for different states, pseudo-elements using the
&:<state>syntax. - or even target the same element with a different parent, using the
<selector> & { ... }syntax.
2. Modularize
While nesting helps a lot in modularizing your CSS files, Sass also has the ability to break down CSS files into smaller chunks and include them into each other. This can be done using the following syntax:
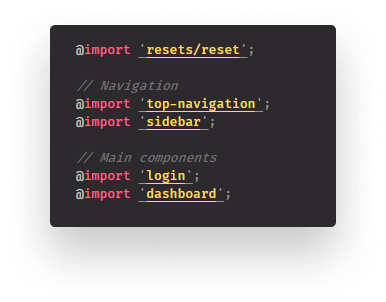
Sass will generate one single CSS file from this, which results in one network request. This means you can break your styles into as many pieces as you want. It also makes it easier to separate the styles of different components from each other.
To mark Sass files as partial — files that should be imported in other .scss files — you can name your files with an underscore in front of them. For example _config.scss.
Note that Sass discourages the continue use of @import. The rule will be phased out in the next few years and will be gradually removed. Prefer to use @use instead.

3. Using Variables
Sass also has the option to use variables. But pure CSS also has this option too. With the use of the var() function, you can start using variables right inside your .css files without the use of any pre-processor. As of writing this article, the global support sits around 94%.
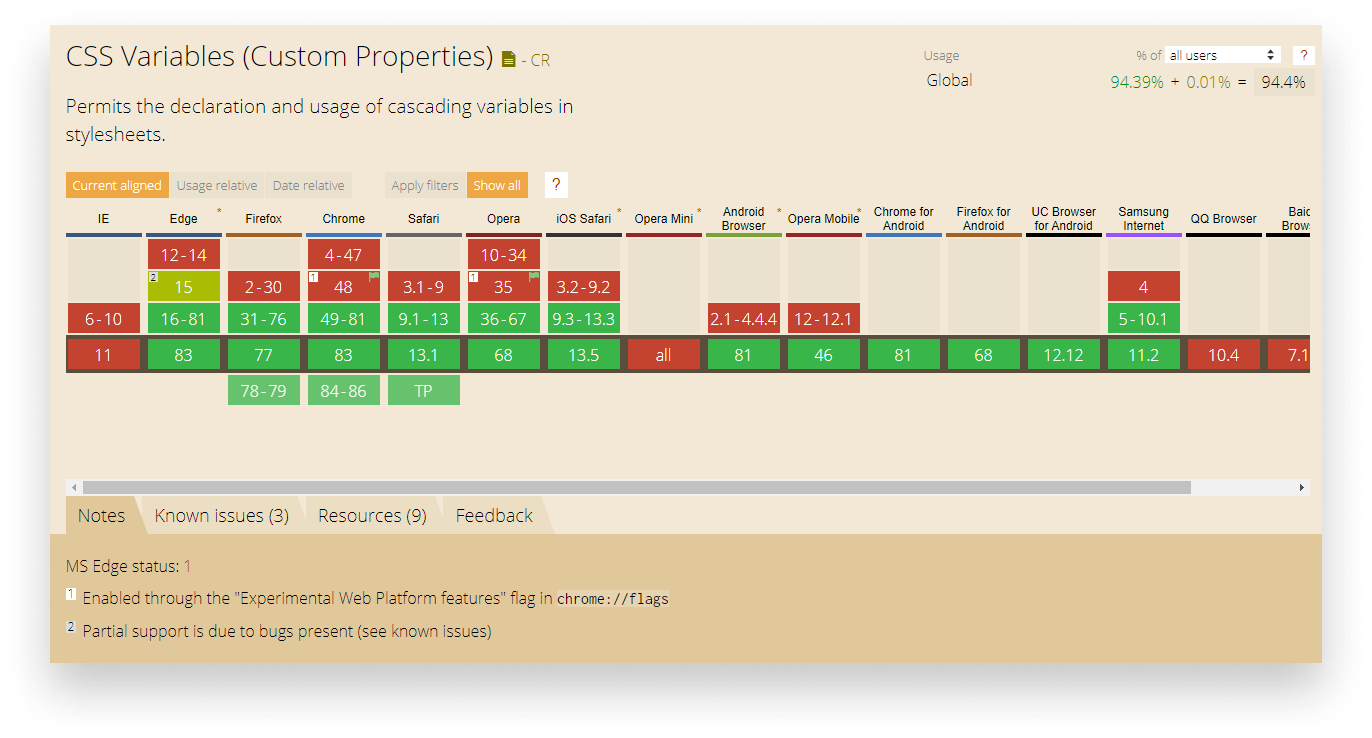
This means that if you need to cater to IE and older browsers, you’re still better of using variables through Sass. This can be done quite simply by assigning a value to a name that begins with a dollar sign.
$colour-white: #FAFAFA;
$colour-pure-white: #FFF;
$colour-off-white: #E8E8E8;
$colour-white-alpha-1: rgba(250, 250, 250, 0.1);
$colour-white-alpha-05: rgba(250, 250, 250, 0.05);
$colour-black: #212121;This makes it convenient for you to define your color scheme in one place, use predefined typography values or even variables for spacing. This way, you have more control over the design and you can enforce rules to create consistency. You can use these variables throughout your project, by referencing the name of the variable.
.dashboard {
    background: $colour-black;
}4. Configure Your Project
By modularizing files and using variables, you also have the option to create style configs for your projects. You can collect configuration options in one place, so they can easily be changed later on.
@import 'colour-palette';
@import 'typography';
@import 'mixins';

// Spacing
$gap-05: 5px;
$gap-10: 10px;
$gap-15: 15px;
$gap-20: 20px;
$gap-25: 25px;

// Border radius
$small: 2px;
$medium: 4px;
$large: 6px;This also means that if you have design changes, you only need to change one value instead of going through hundreds of files.
5. Using At-Rules
You’ve already seen the use of @import. This is called an at-rule. Apart from @import, Sass has other rules that add extra functionality to CSS. One which will be one of your best friends is the @mixin and @include rules.
It lets you define styles that can be re-used throughout your stylesheets.
@mixin button-large {
    background: green;
    padding: 10px 20px;
    box-shadow: 0 4px 10px 0 rgba(33, 33, 33, 0.15);
}

.submit-button {
    @include button-large;
}You define a set of rules with the @mixin rule, which can be later on included anywhere where it’s needed using the @include rule.
You can also create more complex, variable mixins, by adding parameters and some logic to them:
@mixin border-radius($radius: 'small', $position: null) {
    $borderRadius: map-get((
        none: 0,
        small: 2px,
        medium: 4px,
        large: 6px
    ), $radius);

    @if ($position) {
        $side: map.get((
            top:    ('top-left', 'top-right'),
            bottom: ('bottom-left', 'bottom-right'),
            left:   ('top-left', 'bottom-left'),
            right:  ('top-right', 'bottom-right')
        ), $position);

        @each $key in $side {
            border-#{$key}-radius: $borderRadius;
        }
    } @else {
        border-radius: $borderRadius;
    }
}

// Later on...
.card {
    @include border-radius('large', 'top');

    .button {
        @include border-radius('medium');
    }
}

// This will generate:
.card {
    border-top-left-radius: 6px;
    border-top-right-radius: 6px;
}

.card .button {
    border-radius: 4px;
}For example, the above mixin can be used to dynamically generate border-radius. It expects two arguments: the size of the radius and its position. As you can see, you can also have different logical statements such as @if or @each.
Sass also supports the use of interpolation. This lets you embed results of a Sass expression into anywhere using the #{...} syntax.
@mixin get-icon($name) {
    background-image: url('icons/#{$name}.svg');
}6. Maps and Lists
You’ve probably also noticed the use of map.get in the previous code example. This is a built-in function that lets you get values from a map. A map can hold a list of key-value pairs in Sass.
$themes: (
    light: (
        colour-background: #FAFAFA
    ),
    dark: (
        colour-background: #222
    )
);This lets you dynamically get values, to for example theme your application. Sass also supports the use of Lists. Similar to maps, a list can hold a list of values. The most common use-case is to generate similar styles, based on different values.
$icons: 'arrow-left', 'arrow-right', 'arrow-up', 'arrow-down';

@each $icon in $icons {
    .icon-#{$icon} {
      background: url('icons/#{$icon}.svg');;
    }
}7. Using Built-in Modules
There are a handful of other built-in modules for Sass that provides many useful functions, from manipulating colors, to even do math calculations. To use them, you have to import the module at the top of your files with @use <module-name>.
@use 'sass:color';

.color {
    background: color.scale(#000, $lightness: 20%);
    background: color.adjust(#000, $red: 15);
    background: color.adjust(#036, $hue: 30deg);
}Summary
Sass is a powerful tool that helps you enhance the workflow of your CSS. Although CSS has come a long way, it still continues to be a powerful extension. It lets you build more scalable and manageable stylesheets, while also making way for more consistent designs by enforcing the use of predefined values.
What are your favorite parts of Sass? Let us know in the comments. Thank you for taking the time to read this article, happy styling!

Rocket Launch Your Career
Speed up your learning progress with our mentorship program. Join as a mentee to unlock the full potential of Webtips and get a personalized learning experience by experts to master the following frontend technologies:
Courses

CSS - The Complete Guide (including Flexbox, Grid and Sass)

The HTML & CSS Bootcamp

The Creative HTML5 & CSS3 Course
Recommended
How to Improve Data Fetching in React With Suspense?
The Curious Case of Banana in Javascript