
How to Automate Your Code Refactoring
Taking good care of your codebase, addressing tech debts, and doing the occasional code refactoring are some of the many tasks developers would like to avoid. Taking the ever-changing world of frontend into consideration, you may have required to refactor more, than you may care to admit.
Even simple refactors like changing var to a let or const is a huge task when your codebase has hundreds of files. Yet you are only doing the same thing over and over again. It is repetitive and not the most interesting thing to do. Computers are wonderful at doing the same thing over and over again. They do it better, and faster than humans. Therefore, such repetitive tasks can and should be automated.
In this article, we will take a look at how refactoring your code can be automated with scripts. The good part is that you only need to write it once, and you can apply them to any codebase. Let’s say we have a codebase in ES5 and want to migrate it over to ES6. We have two tools that can help us achieve our goals. Codemod, and JSCodeShift.

What is Codemod?
Codemod is an open-source automation tool, developed by Facebook. It is made specifically to help you to refactor large-scale codebases. It is written in Python, which means you can use it through your terminal to give it a command on what you want to refactor.
How does it work?
It works by using regular expressions. Essentially, you give it a regex to match in your code, and you also specify what you want the matches to be replaced to. It’s a simple tool that can be used for relatively simple tasks. For example, staying at our example, you would not be able to tell Codemod which var should be replaced by a let, or a const. It doesn’t have the required context.
How to use Codemod
To install Codemod, you can use pip, a popular package manager created for Python. If you are using Python 2 above 2.7.9, or Python 3 above 3.4, then pip is already installed for you. To check if pip is installed, you can run the following command from your terminal:
python -m pip --version
If you don’t have pip installed, you can follow their instructions on their official docs. And to actually install Codemod, you need to run
pip install codemod
Then you can start refactoring parts of your code by giving out codemod commands in your terminal. An example taken from their official docs, you would replace font tags the following way:
codemod -m -d /home/jrosenstein/www --extensions php,html \
    '<font *color="?(.*?)"?>(.*?)</font>' \
    '<span style="color: \1;">\2</span>'
What is JSCodeShift?
But we are not here for Codemods. It works perfectly for simple examples but what about more complex refactoring? Like turning var to either let or const? This is where JSCodeShift comes into place. It is a toolkit, again, created by Facebook. We can use it to run Codemods for multiple JavaScript or TypeScript files. It includes a runner that executes a transformation rule for each passed file and outputs a summary of how many files were affected. It also includes a wrapper around Recast, which is an AST-to-AST transform tool.
How does it work?
Recently I wrote about how you can build plugins for Babel. Plugins in Babel uses AST to transform your code. The same happens for JSCodeShift. It provides a different, jQuery-like API to Recast, but under the hood, it transforms the AST.

How to use JSCodeShift
To get started with JSCodeShift, first install it globally, using the following npm command:
npm i -g jscodeshift
Then to get all available commands, you can run jscodeshift --help. Let’s see how you would transform files with JSCodeShift. Transformation simply happens with a file that exports a function in the following form:
module.exports = (fileInfo, api, options) => {
    return fileInfo.source;
};This file doesn’t transform anything. It returns the original file, but it helps us see what we have access to as part of this function. We can work with three parameters:
fileInfo: An object that holds exactly two properties: a path to the file, and a source that is a string representation of the code.api: It exposes the JSCodeShift API throughapi.jscodeshiftand some helper functions for the runner for printing to the console.options: The default options and the options passed to the CLI command.
To execute this, you can run jscodeshift src in your terminal, where the parameter after jscodeshift defines the file(s) it needs to transform. And which file to use for the transform? By default, JSCodeShift looks for a file called transform.js in the same directory, where the command is executed from. You can also pass a custom transform file by using the -t flag.
To see an actual working example, let’s say you want to get rid of console.logs in your codebase. You could do this with a simple find and replace, but imagine you have all kinds of consoles, including:
console.log('👋');
console.log(`Hello ${user.name}`);
console.warn('[Deprecation] Field `channel` has been deprecated, but got', channel);
To find and replace all occurrences at once, you would also need to use regex for this. So how would you do this with JSCodeShift? Let’s start with the export and two variables. One to reference the API of JSCodeShift, and one for storing the code of the target file:
module.exports = (fileInfo, api, options) => {
    const j = api.jscodeshift;
    const root = j(fileInfo.source);

    return root.toSource();
};The j variable holds the API of JSCodeShift. You can find all available properties in this documentation.
The root variable, on the other hand, holds the source code of the target file. Since it is wrapped inside the j function call, we get a collection back. This is why we have to call .toSource on it, to turn it back into a string representation of the code. But what is a collection?
Collections
A collection is returned when you use the JSCodeShift API. If you try to log out the root variable to the console, you will get back a Collection. Collections in JSCodeShift are a special type of object that holds node paths. Node paths are holding information about the child-parent relationship of nodes. And these node paths are made up of individual nodes. Nodes are what the AST is made of. In a nutshell, this is how the API is built up.

Individual nodes are what you are seeing in an AST Explorer. These are the objects that we are going to work with:
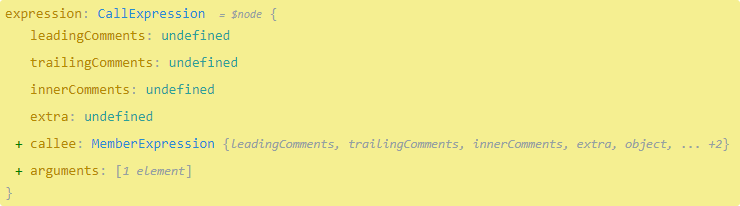
The image above shows the AST representation of a console.log. So we know we are looking for a CallExpression. We can use the find method on the collection to find all CallExpressions, and we can simply call remove to get rid of the node, making our code look like this:
module.exports = (fileInfo, api, options) => {
    const j = api.jscodeshift;
    const root = j(fileInfo.source)

    return root.find(j.CallExpression)
        .remove()
        .toSource();
};There are two things to note:
- First, you can chain function calls in JSCodeShift, which makes your code more expressive
- Second, if you try this code, you will notice that not only your
console.logsare gone, but a bunch of other things as well
This is because a CallExpression can not only be console.logs, but other function calls, such as:
console.log('🌳') -> "CallExpression"
fun();            -> "CallExpression"
[...].forEach();  -> "CallExpression"
Object.keys();    -> "CallExpression"
So we need to narrow down the search. Luckily for us, find accepts a second argument, where we can narrow down the type of node we are looking for. But what do we need to pass? If you go back to AST Explorer, you can see that the console.log CallExpression has a specific signature.
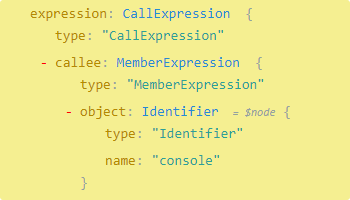
We can replicate this in our code to narrow down the search results and only target console calls:
module.exports = (fileInfo, api, options) => {
    const j = api.jscodeshift;
    const root = j(fileInfo.source)
    const callExpressionType = {
        callee: {
            type: 'MemberExpression',
            object: {
                type: 'Identifier',
                name: 'console'
            }
        }
    };

    return root.find(j.CallExpression, callExpressionType)
        .remove()
        .toSource();
};This is exactly the JavaScript representation of the callee of the CallExpression. If you rerun this transform function, now you should get the desired behavior.

Conclusion
As we can see, they don’t take too much time to write, but the things you gain outweigh the effort put into them. And it scales better than any human doing refactoring. No matter if your codebase is made up of 10, 100, or 1000 files, JSCodeShift can refactor all of them at once in seconds.
Also, JSCodeShift is widely known, so you can already find predefined transformation functions for the most common tasks. I recommend having a look at these two repositories where you can find various transformation rules:
- js-codemod for transforming code to next-generation JavaScript
- react-codemod for transforming React components
Have you used Codemod or JSCodeShift before? What are your thoughts about them? Let us know in the comments below! Thank you for reading through, happy refactoring!

Rocket Launch Your Career
Speed up your learning progress with our mentorship program. Join as a mentee to unlock the full potential of Webtips and get a personalized learning experience by experts to master the following frontend technologies:
Courses


Recommended

How to Get Started With React + JSON Server

Building Scalable APIs With NestJS and MongoDB