
How to Make Simple Feature Flags in React
Feature flags — or feature toggles — is a technique where you can provide some means to turn on and off certain features of your application with ease, without the need to deploy additional code.
This lets you show and hide parts of your application to users or to other developers, and QAs.
Why feature flags are good for us?
There are a number of reasons why you would want to use feature flags in your application. One of them is already mentioned above:
- You can enable features only to internal people to test it in a live environment, without exposing it to other users.
- You can deploy parts of a feature without a complete whole for testing purposes.
- You may also want to enable a certain feature only to a specific user group.
- You can also use it for experiments to see how different features perform.
And the list may go on. It helps you to put continuous deployment in place as you can safely release — even unpolished — features that are behind a toggle. This provides a safety net that ensures that existing code won’t break.

Setting Up the Project
If you already have a project set up where you want to integrate feature flags, you can skip to the next section, otherwise you can follow along to set up a new project.
To quickly set up a new React project, I’ve used react-scripts. Create a new project folder and install the following packages:
npm i react react-dom react-scripts
Add the following scripts to your package.json file:
"scripts": {
    "start": "react-scripts start",
    "build": "react-scripts build",
    "test": "react-scripts test --env=jsdom",
    "eject": "react-scripts eject"
}Create a public directory with an index.html file and add a root element for React:
<!DOCTYPE html>
<html lang="en">
    <head>
        <meta charset="utf-8" />
        <meta name="viewport" content="width=device-width, initial-scale=1, shrink-to-fit=no" />
        <title>Feature flags</title>
    </head>

    <body>
        <noscript>You need to enable JavaScript to run this app.</noscript>
        <div id="root"></div>
    </body>
</html>And lastly, also add a src folder with an index.js where you bootstrap React:
import React from 'react';
import ReactDOM from 'react-dom';

import App from './App';

ReactDOM.render(
    <React.StrictMode>
        <App />
    </React.StrictMode>,
    document.getElementById('root')
);I’ve also created an App.js file next to index.js with an empty stylesheet, which returns nothing at the moment:
import React from 'react';

const App = () => {
    return (
        <div className="App">👋</div>
    );
};


export default App;Adding New Feature Flags
Flags can be stored in various places, whether it be in a simple state, in a cookie, inside local storage, or even on the server requesting them through a fetch. In this example, we will store them inside local storage. We will be using the following format to create new features:
[{
    name: 'banner',
    description: 'Banner shown on top of the page',
    active: false
}]Each feature will have a unique name that we can later reference in React, a short description about the functionality it adds, and an active flag for deciding whether we need to show it or not. These will be stored inside an array. To store them in local storage, add the following function to your App.js and call it at the top of your component:
const initFeatures = () => {
    if (!localStorage.getItem('flags')) {
        localStorage.setItem('flags', JSON.stringify([
            { name: 'banner', description: 'Banner shown on top of the page', active: false },
            { name: 'info-message', description: 'Enhance info message with icon and link', active: true },
            { name: 'New block', description: 'New block added on page', active: false }
        ]));
    }
};

const App = () => {
    initFeatures();
    ...
}This will create three new feature flags, if there are no flags yet in the localStorage. Note that you will have to JSON.stringify your objects as localStorage can only accept strings.

Adding the Feature Component
To reference them in React and create new features based on them, create a new file inside your src folder called Feature.js. This component will handle the toggling of features. To see how we want this component to behave, let’s see an example usage:
import Feature from './Feature';

const App = () => {
    initFeatures();

    return (
        <div className="App">
            <Feature name="banner">
                <Banner />
            </Feature>
        </div>
    );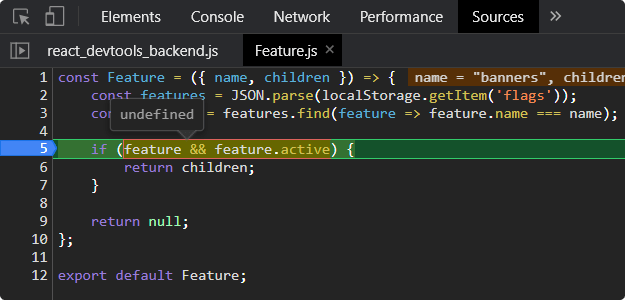
};We want to call this component with a name and the actual feature inside it, that we want to render. First, we want to get the feature from localStorage and see if it set to active. In this case, we can render the children, otherwise we can simply return null.
const Feature = ({ name, children }) => {
    const features = JSON.parse(localStorage.getItem('flags'));
    const feature = features.find(feature => feature.name === name);

    if (feature && feature.active) {
        return children;
    }

    return null;
};

export default Feature;For this, we can use Array.prototype.find. If we now create a Banner component, and try to render it inside our Feature, the component will find the flag inside the localStorage based on its name and it will be shown if the active state of the corresponding flag is set to true, and it will be hidden if it is set to false.
Note that when you are adding extra CSS as part of a feature behind a toggle, you may want to dynamically import the CSS to avoid unnecessary rules when the feature is off.
let cssImported = false;

const Banner = () => {
    if (!cssImported) {
        import('./css/banner.css');
        cssImported = true;
    }

    ...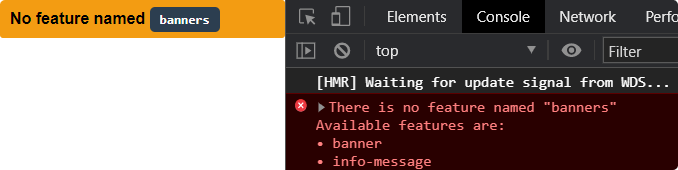
};But what happens if you acidentally mistype a feature or use a non-existent feature name?
It won’t find the feature based on the name, and so nothing will be rendered, which is a good behavior in production as it ensures that nothing breaks. But what about development? You won’t see the feature regardless of whether it is set to active or not, which can lead to confusion.
Adding error reporting for invalid flags
To prevent this, we can add a new if statement before returning null:
const Feature = ({ name, fallback, children }) => {
    ...

    if (process.env.NODE_ENV === 'development' && !feature) {
        const alertStyles = { ... };
        const featureNameStyles = { ... };

        console.error(`There is no feature named "${name}"\nAvailable features are:\n${features.map(feature => `• ${feature.name}`).join('\n')}`);

        return (
            <span style={alertStyles}>
                No feature named <code style={featureNameStyles}>{name}</code>
            </span>
        );
    }

    return null;
};This will make sure that if there is no feature found, it will be visible for the developer and only the developer. The first part of the if statement makes sure to only add this block for non-production builds. You can either provide a visible block on the UI to warn the developer that they are referencing an invalid flag, or you can log an error to the console. I’ve provided both solutions here. You can also list out the available valid flags.
Unfortunately, you can only test this by building the app with npm run build as React doesn’t allow you to override NODE_ENV and start a dev server in production mode. In order to configure this, you would have to eject first.

Adding fallback options
Another common problem is that often, you have to switch out an existing feature to a new one, rather than adding an entirely new block. To add this option, we can introduce a fallback prop to the component:
const App = () => {
    initFeatures();

    const infoMessage = (
        <span className="message">Check out our latest updates in our repo</span>
    )

    return (
        <div className="App">
            <Feature name="banners">
                <Banner />
            </Feature>

            <main className="content">
                <Feature name="info-message" fallback={infoMessage}>
                    <span className="message">📦 Check out the latest updates in our <a href="#">repo</a></span>
                </Feature>
            </main>
        </div>
    );
};It can accept a component or a JSX element to render in case the feature is toggled off. To handle this extra functionality, simply return the fallback passed to Feature:
const Feature = ({ name, fallback, children }) => {
    const features = JSON.parse(localStorage.getItem('flags'));
    const feature = features.find(feature => feature.name === name);

    if (feature) {
        if (feature.active) {
            return children;
        }

        if (fallback) {
            return fallback;
        }
    }

    ...
};Creating a Bookmarklet to Toggle Features
All that is left to do, is to provide some means to easily toggle the features on and off, as until now, you still needed to modify localStorage. For this purpose, we can create a bookmarklet with a GUI that can serve as a dashboard for the available flags where other developers, QAs, and product can also turn them on and off whenever they want. This is the script in one go for the bookmarklet:
javascript:(() => {
    const flags = JSON.parse(localStorage.getItem('flags'));

    // Check if there are feature flags on the site
    if (flags && flags.length) {

        // Add styles for the bookmarklet and append it to the document head
        const styles = ``;

        const style = document.createElement('style');
        style.type = 'text/css';
        style.appendChild(document.createTextNode(styles));

        document.head.appendChild(style);

        // Create a layout for the bookmarklet
        const html = `
            <main class="ff-wrapper">
                <h1 class="ff-header">Feature flags</h1>
                <div class="ff-container">
                <table class="ff-table">
                    ${flags.map((flag, index) => {
                        return `
                            <tr class="ff-row">
                                <td class="ff-column">
                                    <strong class="ff-title">${flag.name}</strong>
                                    <span class="ff-description">${flag.description}</span>
                                </td>
                                <td class="ff-column">
                                    <label class="ff-label">
                                        <input type="checkbox" ${flag.active ? 'checked' : ''} class="ff-input" />
                                        <span class="ff-span" data-index="${index}"></span>
                                    </label>
                                </td>
                            </tr>
                        `;
                    }).join('')}
                </table>
                </div>

                <button class="ff-reload">Reload flags</button>
                <button class="ff-apply">Apply changes</button>
            </main>
        `;

        // Add the bookmarklet to the document
        document.body.append(
            new DOMParser()
                .parseFromString(html, 'text/html')
                .getElementsByTagName('main')[0]
        );

        // Add an event listener for the toggles
        [...document.querySelectorAll('.ff-span')].forEach(feature => {
            feature.addEventListener('click', (e) => {
                flags[Number(e.target.dataset.index)].active = !e.target.previousElementSibling.checked;

                localStorage.setItem('flags', JSON.stringify(flags));
            });
        });

        // Add an event listener for refreshing the flags
        document.querySelector('.ff-reload').addEventListener('click', () => {
            localStorage.clear();
            window.location.reload();
        });

        // Add an event listener for applying changes
        document.querySelector('.ff-apply').addEventListener('click', () => {
            window.location.reload();
        });
    } else {
        alert('No feature flags on site');
    }
})();Let’s quickly go over the script to see how it works:
- First, on
line:5we want to make sure that there are features on the site, so simply requestflagsfromlocalStorageto test it. Online:72in theelseblock, we can display an alert message if there are no features. - Next, you want to create some styles and add it to the document, this is what happens from
line:8-14. - From
line:17-44, I’ve created the layout for the bookmarklet. It will display a table with the available features, their name, description, and a toggle to switch them on and off. In order to loop through theflagsI’ve used amapto return a new row for every feature, then joined them together online:37. - This layout is then appended to the document between
line:47-51. - Then you can attach the different event listeners. First, toggling the flags on and off by clicking on the toggle. This is done from
line:54. It gets thedata-indexattribute that is set in the layout and sets theactivestate of the corresponding flag to the state of its checkbox. Then the whole state is rewritten intoflagsinlocalStorage. - From
line:63, I’ve added a reload button. This clears the storage and reloads the page. This is useful if changes are made inside React, but you still have an older version in local storage. - From
line:69, the apply button just simply reloads the page.
To add it as a new bookmarklet, don’t forget to minify the script first. You can use an online tool such as JavaScript Minifier.
Testing out the bookmarklet
All that’s left to do is to test it out and see how it works. After you’ve added it as a bookmarklet, open your app and click on it to open the toggles.

Now you can toggle features on and off through an interface. You can also see the fallback option in action. When the info-message is being toggled off, you see the older version of the message. If you happen to use a non-existent name, you will also be notified. Note that this won’t happen for production builds, only for development. If you would like to learn more about bookmarklets I recommend checking out the tutorial below.
Summary
And now you’ve created a fully functioning feature toggle component in React with the ability to fall back to old implementation if needed. You can further build on this solution by using an API endpoint instead of local storage for the flags. This way, you can allow product to create, modify or remove flags through a dashboard with a few clicks. This eliminates the need to touch the codebase when introducing new flags and you can also quickly disable certain features quickly if needed.
I’ve created a repository for the complete project on GitHub, with CSS included, you can clone it from here:
Clone the complete GitHub repository
Do you have experience using feature flags? Let us know your thoughts in the comments below! Thank you for reading through, happy coding!

Rocket Launch Your Career
Speed up your learning progress with our mentorship program. Join as a mentee to unlock the full potential of Webtips and get a personalized learning experience by experts to master the following frontend technologies:
Courses


Recommended

Simple Ways to Fake Masonry in CSS

How to Render React on the Server-Side With Next.js