An In-depth Guide on How To Build Mobile Apps With React Native
As a web developer, there’s only one platform where you may struggle to create applications, and that is mobile.
Web developers long have the ability to develop not just web applications, but chrome extensions, bookmarklets, and even desktop applications with nothing more, but web technologies. The only place where we haven’t ventured into is mobile app development.
So far mobile applications have been written in Java or C#, which means you would not only need to learn about native mobile APIs, but you would also need to gain knowledge in other programming languages.
In this tutorial, we will take a look at how you can develop a mobile application with technologies you already know. We will use React Native to generate native code for us while writing everything in JavaScript.

Table of Contents
- Introduction
- What Will be Building?
- Setting up the Project
- The Structure of a React Native Project
- How to Start and Test Your App
- Configuring the Splash Screen
- Adding a Header for the App
- Displaying Data Inside the App
- Adding Styles to the App
- Adding Interactions
- How to Add Routing
- Making the Details View
- Reflect Changes on Different Routes
- Adding extra Functionality to Headers
- How to Build the App
- What are the Drawbacks of Expo
- Summary
What is React Native?
React Native is a framework that provides you the tools necessary to write native mobile apps with technologies you already know; namely React. It makes it super easy to share code across different platforms, and lets you also expand your web app to the world of mobile.
Prerequisites
There are some prerequisites for this tutorial. It is assumed that you already familiar with React, and know, how JSX works. We will also be using React hooks. If you have no experience in using hooks, I have a tutorial covering how you can fetch data with them. It gives you the concepts that we will use in this tutorial.

Apart from that, you don’t need prior knowledge of mobile development. Everything will be written in JavaScript. So let’s see what we are going to build.
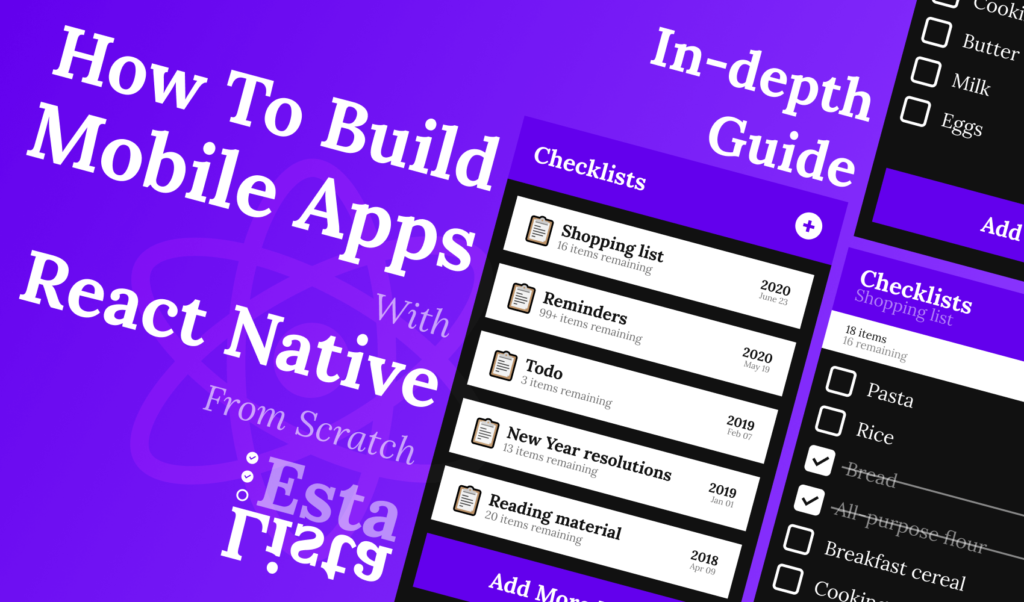
What We Will be Building?
We will be building the following application:

The classical todo app, where you can create and manage different todo lists. We will take a look at a number of things, which will help you understand, how to tackle common problems when building React Native mobile apps. Here’s a list of what will be covered in this tutorial:
- First, we will look at how to set up the environment. As we are not working with a web app, you are going to need some additional tools to convert React code to native code.
- Next, we will look at the overall structure of a React Native app, and how it is built up.
- We will be looking at how to build and test the application and check changes on your mobile.
- We will also take a look at how you can configure the splash screen and icon for your mobile app.
- You’ll be learning how to display information, loop through it, and also store it for later reuse.
- We will look at how to add custom styles and import custom fonts to the app.
- After that, we will start adding some interactivity to the elements for the user to interact with.
- We will check, how you can implement routing to present different views to the user.
- You’ll also learn how to create modals to present information above existing views.
- Lastly, we will take a look at how you can bundle and generate a store ready
.apkfile for your app. - As a summary, we will look at what are some of the drawbacks of using this setup and see what are some other alternatives. I will also provide a link to the GitHub repository, where you will find the whole project in one go.
Without further ado, let’s jump into setting up the project.

Setting up the Project
To get faster into coding, we will make use of Expo. It is a set of tools for building apps without much configuration. It can be used both for Android and IOS. We will take a more throughout look at Expo at the end of this tutorial. For now, start by installing the expo-cli globally with:
npm i -g expo-cli
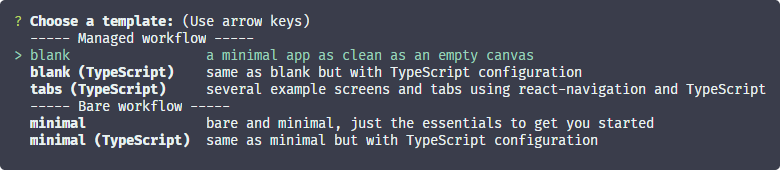
Once Expo is installed, go ahead and bootstrap an empty React Native project with expo init [TheNameOfYourProject]. Expo will ask you which template you’ll want to use. Choose “blank”.
Once installed, Expo will also download the necessary node dependencies for you so you don’t need to run npm i separately inside your project.
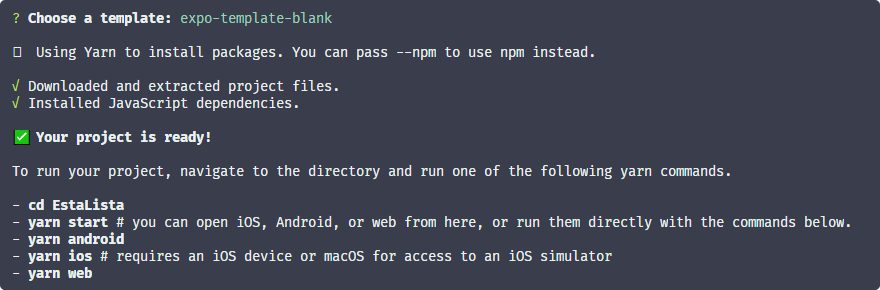
CD into your project and you will be greeted with the following folder structure:
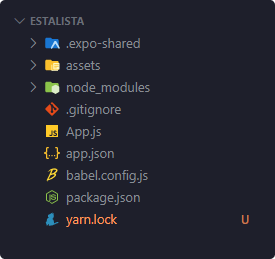
The Structure of a React Native Project
The files and folders that are worth nothing are the two folders at the top, and your app.json file. Let’s start with the .expo-shared folder.
.expo-shared
Inside this folder, you will only find one file, called assets.json. This file is required for asset optimization. It contains information on which asset was optimized by Expo before. This guarantees that if you run expo optimize on an image, the same image can’t be optimized again, unless it changes.
This is useful if multiple people are working on the same project. It ensures that optimized assets are synced across collaborators.
.expo
You may don’t have this folder right away, but Expo will generate one, once you start developing. This folder contains settings and cached assets. If you experience problems with Expo, you may try to delete this folder to clear the cache.
assets
Your assets folder is where you should store your static assets, such as images and fonts.
app.json
This is where you can configure your app. It can be used for configuring your app’s overall feel and look, such as your app’s name, description, it’s icon or splash screen.
For the full list of options available, you can refer to Expo’s official documentation.
The rest of the files are not specifically related to Expo and React Native, you can find them in other projects. Therefore, they are pretty self-explanatory.
Note: your folder structure will slightly differ if you don’t use Expo for your project.
How to Start and Test Your App
The next step is to actually start the project. Run npm run android to start the server. It will start Metro bundler for you, the official JavaScript bundler for React Native.
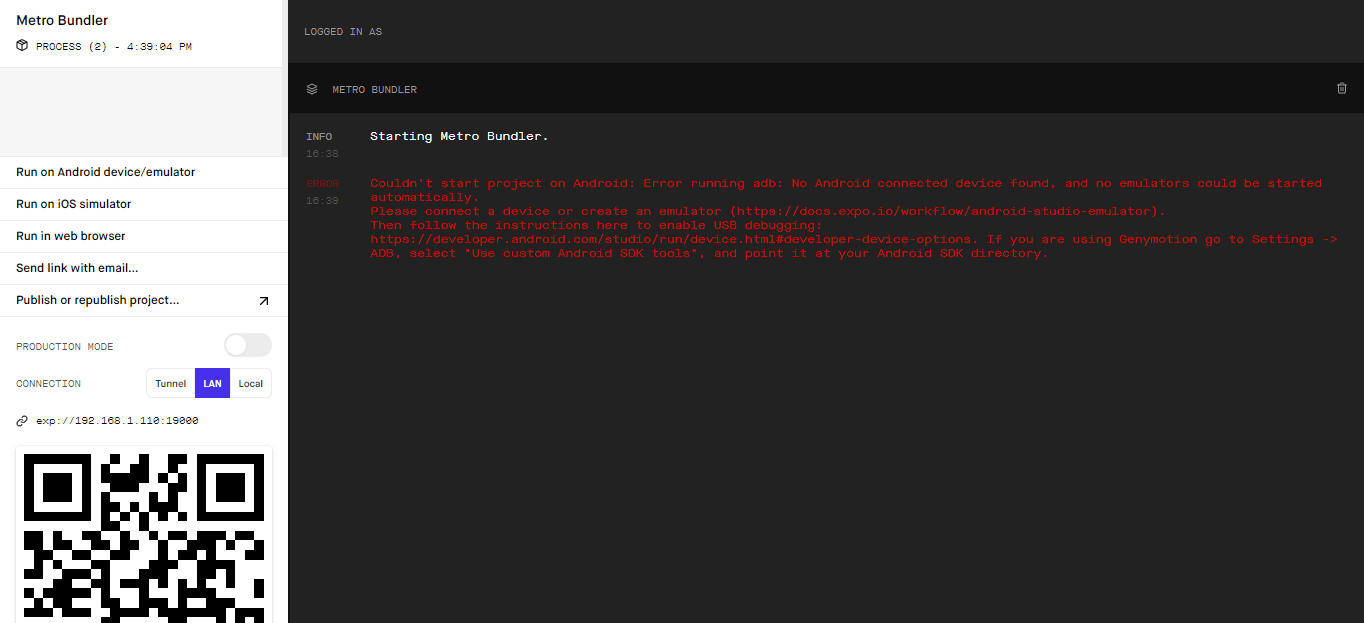
It lets you run your app in a browser, in an emulator, or on your actual device. Right now, it couldn’t find any Android device, so let’s fix that.
Head over to Google Play Store, and download the Expo client for Android. This is used for previewing the app. Next, you need to enabled USB debugging on your phone, to allow Expo to communicate with it.
Enable USB debugging
If you already know, how to enable USB debugging on your phone, or it is already enabled, you can skip this step.
First, head over to your “Settings“, click on “About Phone“, and scroll down to “Build Number“. Tap the build number 7 times to enable developer options.
Inside your settings, now you should see a “Developer options” menu. Click on it and look for “USB debugging” and enable it.
Depending on your Android version, the steps may differ a bit for you. For example, on Android 8.0, you should look for “System” rather than “About Phone“. For a more throughout step-by-step tutorial on how to enable USB debugging, please refer to Android Studio’s official documentation:
Configure on-device developer options
Launching the app on your mobile
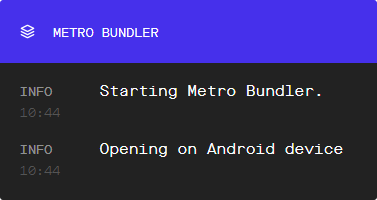
Now, connect your phone to your PC through USB, and relaunch Metro bundler with npm run android. It should now open the app on your phone.
If you are seeing a blank white screen or you are getting a “Network response timed out” error, you can try the following steps:
- Open the Expo client on your phone and scan the QR Code shown inside the Metro Bundler interface.
- You can try to set the connection setting to either Local or Tunnel. Keep in mind, setting the connection mode to Tunnel can cause slowness and delays.
- Make sure you are not connected to a VPN.
- Change your network settings to private and disable your firewall. The issue commonly occurs when a firewall or antivirus blocks the connection.

This issue has also been brought up on the expo-cli repo. If none of the above options solved your issue, you can read through the thread for additional solutions.
Expo-cli repo: Network response timed out.
If you experience problems with Expo after development, you can also try to run Expo with a clean cache, using expo r -c, or you can reinstall packages by first deleting your node_modules folder.
Making your first changes
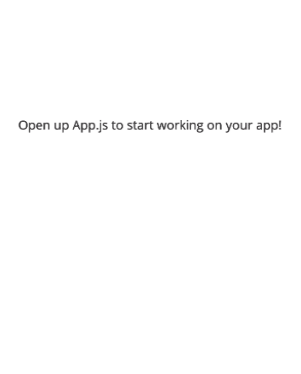
If everything was set up correctly, you should see a message on your phone!
Open up App.js to start working on your app!
So go ahead as the message says and open your App.js file. This is where your app bootstraps from. Change the message and you’ll see that changes are reflected instantly.
Configuring the Splash Screen
The splash screen for your app is configured through the app.json file in your project’s root. However, Expo comes with a default splash screen, so all you need to do, is change the image inside assets/splash.png.
To make the resolution XHDPI, make it at least 720px x 1280px. For a full list of dimensions, you can see Phonegap’s documentation.

However, this alone won’t look too good. As you can see, there are white borders around the splash screen. To change it, head over to your app.json file and change resizeMode to cover and also change the background color to a similar one to the splash screen to make it blend in.
"splash": {
  "image": "./assets/splash.png",
  "resizeMode": "cover",
  "backgroundColor": "#6300ED"
},While here, you can also custimize your app’s icon
Adding a Header for the App
Let’s start building the app, by adding the header first. To avoid messing around with styles, I will be using a UI library for this project, called React Native Paper.
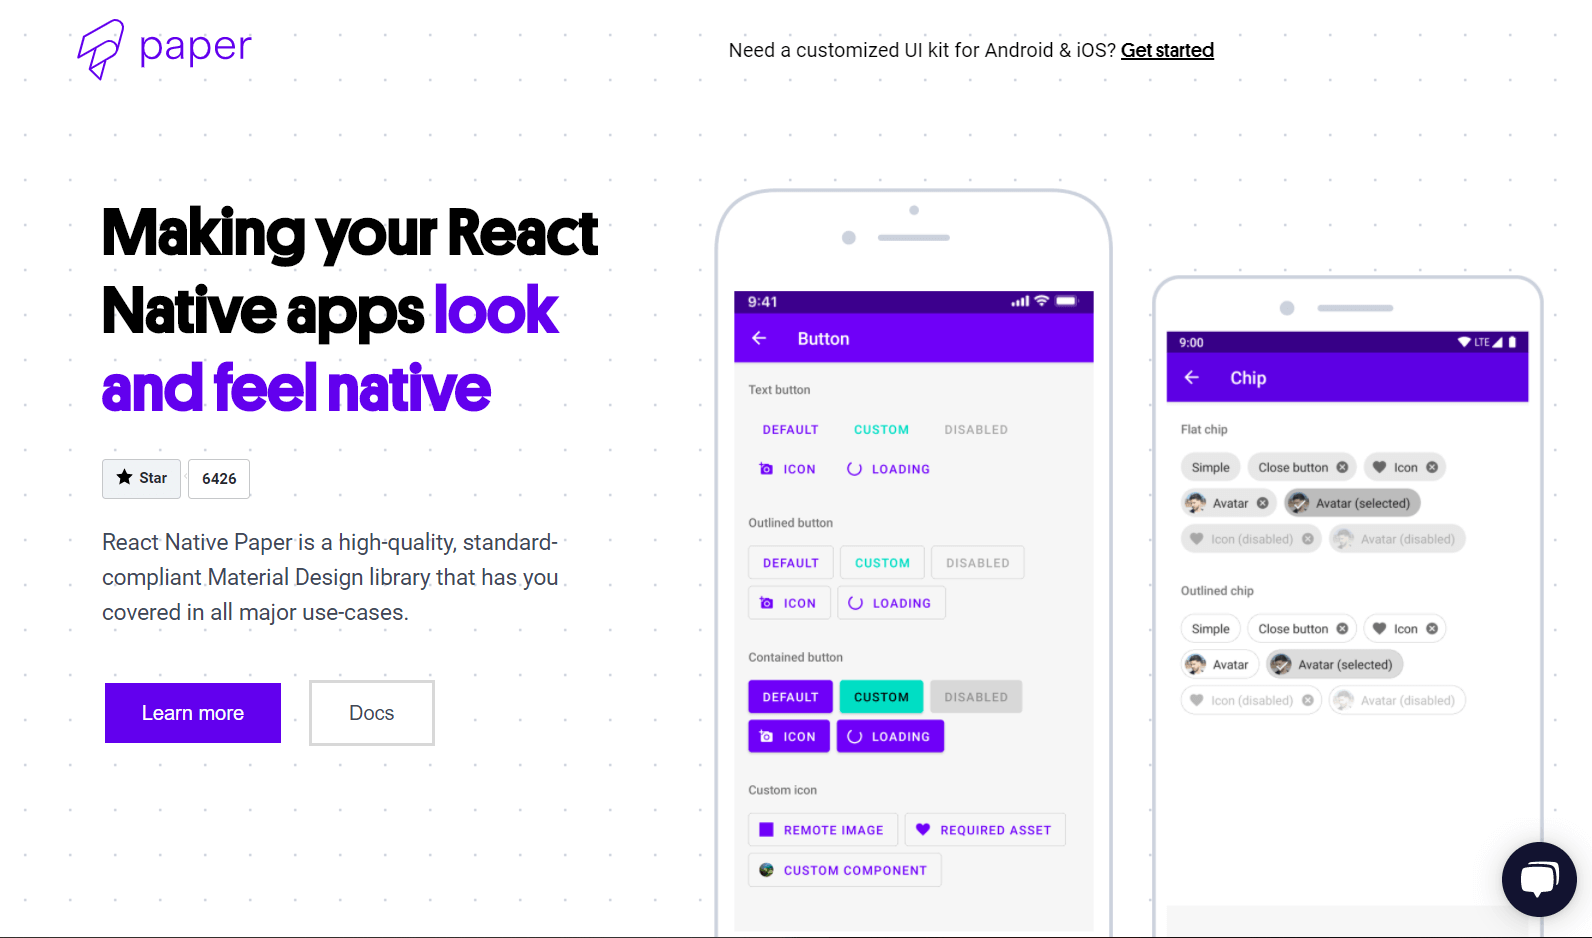
Install React Native Paper as a dependency by running yarn add react-native-paper inside your console.
To keep things organized, create a new folder called components and create a Header.js file inside for the Header component.
import * as React from 'react';
import { Appbar } from 'react-native-paper';

const Header = () => {
    return (
        <Appbar.Header>
            <Appbar.Content title="Checklists" />
            <Appbar.Action icon="plus-circle" />
        </Appbar.Header>
    );
};

export default Header;Import Ąppbar from react-native-paper and export the above component. Inside your App.js file, you can remove everything for now, and import the Header.
import React from 'react';
import Header from './components/Header';
export default function App() {
return (
<Header />
);
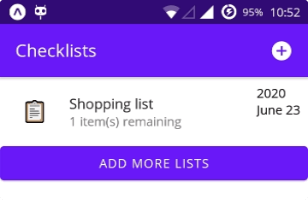
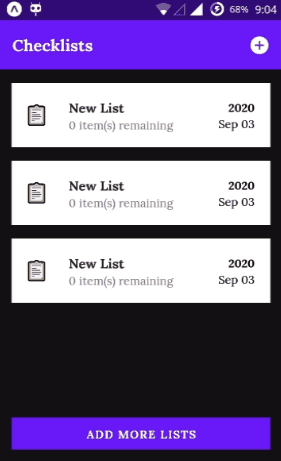
}This will create a header similar to the one below.

Displaying Data Inside the App
To display any data, we need a way to store the data created by users, that we can later reuse inside their app. For this purpose, I will be using the async-storage package, which provides a global state for the app.
Async Storage is an easy solution for small applications where you need unencrypted data stored in key-value pairs. It stores information on your device and stays there until the app is deleted. It works like a Local Storage on the web.
Setting up a data storage
Install the package with yarn add @react-native-community/async-storage, and create a file called Storage.js at the root of your project. This file will be responsible for getting, setting, and removing data. This means we will need to export a function with three methods for now: get, set, and remove. Add the following to your Storage.js:
import AsyncStorage from '@react-native-community/async-storage';

const Storage = {
    async get() {
        try {
            const json = await AsyncStorage.getItem('@data');

            return json != null ? JSON.parse(json) : [];
        } catch(e) {
            // Error reading value
        }
    },

    async set(checklist) {
        try {
            const currentState = await this.get();
            const newState = currentState.map(state => checklist.id === state.id ? checklist : state);

            await AsyncStorage.setItem('@data', JSON.stringify(newState));
        } catch (e) {
            // Saving error
        }
    },

    async remove(id) {
        try {
            const currentState = await this.get();
            const newState = currentState.filter(state => state.id !== id);

            await AsyncStorage.setItem('@data', JSON.stringify(newState));
        } catch (e) {
            // Saving error
        }
    }
};

export default Storage;AsyncStorage — as the name suggests — works with async/await so we need async functions. It’s only capable of storing string values, so if you need to work with complex objects, it has to be converted with JSON.stringify and JSON.parse.
The param you pass to getItem and setItem can be a string of your choice. In case we already have some user-generated data, we return that inside get, otherwise, we can return an empty array.
For setting a checklist, we will pass the whole object to the function, and create a newState based on the passed checklist’s id, then rewrite it to @data.
You can import this file into your App.js and create a new variable to make the data globally available.
import React from 'react';

import Header from './components/Header';

import Storage from  './Storage';

const checklists = Storage.get();

export default function App() {
    return (
        <Header />
    );
}Based on this data, we can generate a list and display it to the user. But before doing that, let’s see what kind of data do we need exactly.
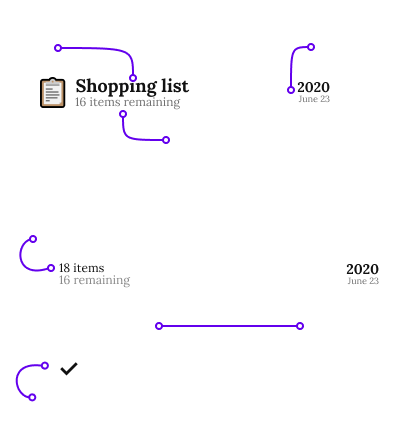
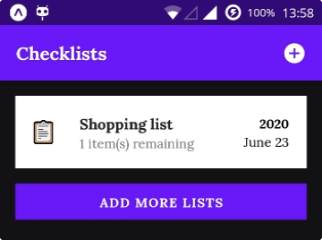
As you can see from the diagram above, we have two views. One for the lists and one for each individual todo list.
Inside the list, we will need to display:
- Each checklist’s title
- The number of unchecked items remaining inside them
- The creation date
Inside each checklist, we can have any number of items and they will have:
- A name
- A state: checked or unchecked
Here we will also show the total number of items, above the remaining items. This means, we can get away with a data structure similar to this:
[{
  "id": 0,
  "name": "Shopping list",
  "date": {
    "year": 2020,
    "monthAndDay": "June 23"
  },
  "items": [
    {
      "id": 0,
      "name": "Pasta",
      "checked": false
    },
    {
      "id": 1,
      "name": "Rice",
      "checked": true
    }
  ]
}, { ... }, { ... }]There’s a couple of things you can notice. For example, I’ve broken down the date to year and month/day into separate nodes. This is because they will get different styles, so they need to be handled separately.
Another thing is that both checklists and their items have ids. This is required for identifying each element, so we update the correct one whenever we make changes.
You may also notice there is no node for the total and remaining items. We don’t need to store them as both can be calculated based on the items array.
Displaying the stored data
To test things out, temporarily add the above example data to to get function of Storage.
return json != null ? JSON.parse(json) : [{
  // Put your test data here
}];Create a new file called List.js under components and import it to your App component, passing the checklists down to it.
import React from 'react';

import Header from './components/Header';
import List from './components/List';

import Storage from  './Storage';

const checklists = Storage.get();

export default function App() {
    return (
        <React.Fragment>
            <Header />
            <List list={checklists} />
        </React.Fragment>
    );
};Inside your List.js component, export the following:
import React from 'react';
import { Text, View } from 'react-native';
import { Button, List } from 'react-native-paper';
const Checklist = ({ list }) => {
const AddButton = () => <Button mode="contained">Add More Lists</Button>;
const Date = ({ date }) => (
<View>
<Text>{date.year}</Text>
<Text>{date.monthAndDay}</Text>
</View>
);
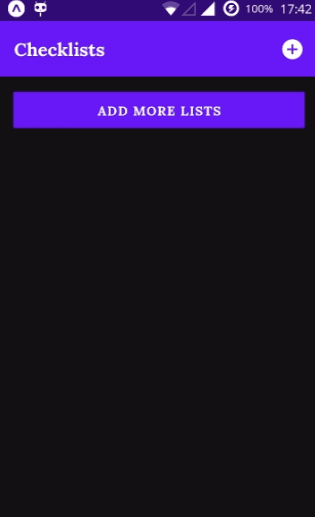
if (!list.length) {
return (
<View>
<AddButton />
</View>
);
}
const checklists = list.map((checklist, index) => (
<List.Item
key={index}
title={checklist.name}
description={`${checklist.items.filter(item => !item.checked).length} item(s) remaining`}
left={props => <List.Icon icon={require('../assets/checklist-icon.png')} />}
right={props => <Date date={checklist.date} />}
/>
));
return (
<View>
{checklists}
<AddButton />
</View>
);
};
export default Checklist;This is the component where we want to export the whole list and the add button. Both the Button and List components are used from react-native-paper.
You’ll also notice that I’ve used View and Text for the Date. This is because, in React Native, you need to wrap texts into Text components to display them. Also, you can’t use wrappers like div. Instead, you need to use View.
I’ve also added an if statement, to check if there’s any checklist to be displayed. If there’s none, we will just display the AddButton.
As you can see, inside the description prop of the List.Item we can filter for the unchecked entries to calculate the number of remaining items. I’ve also added a custom icon to the assets folder, which I’ve imported here to be used on the left-hand side. On the right-hand side, the creation date will be displayed.
The only problem with this solution is that the list prop, which contains the data, returns a Promise from the AsyncStorage. To battle this, we need to use a hook to wait for the arrival of the data, before using it. But instead of doing this inside the List component, let’s lift the logic up to the App component, as we will reuse this data elsewhere throughout the application. Rewrite your App.js file accordingly:
import React, { useState, useEffect } from 'react';
import Header from './components/Header';
import List from './components/List';

import Storage from  './Storage';

export default function App() {
    const [checklists, updateChecklists] = useState({});

    useEffect(() => {
        const getChecklist = async () => {
            const checklistResponse = await Storage.get();

            updateChecklists(checklistResponse);
        };

        getChecklist();
    }, []);

    return (
        <React.Fragment>
            <Header />
            <List list={checklists} />
        </React.Fragment>
    );
};Import useState and useEffect from React, then create a new state on line:8. Add a new useEffect block and fetch the results from the Storage. Since useEffects can’t be an async function directly, you’ll need to define a function inside it.
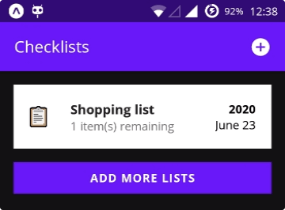
With this component in place, you should have a similar view:
Adding Styles to the App
As you can see, it’s not looking quite similar to the design of the app, so let’s add some styles. First, change the background color to black. Global styles like this, can be configured inside your app.json. Add the following line:
"backgroundColor": "#111111"Now we can configure the styles for the list items. However, you can’t use regular CSS in React Native. Instead, you will need to define the styles in JavaScript objects.
Open your List.js file and create a new stylesheet with the following code:
// Also import StyleSheet from 'react-native'
import { Text, View, StyleSheet } from 'react-native';

const styles = StyleSheet.create({
    bold: {
        fontWeight: 'bold'
    },
    list: {
        margin: 15
    },
    listItem: {
        backgroundColor: '#FFF',
        marginBottom: 15
    },
    listItemIcon: {
        marginLeft: 0
    },
    date: {
      display: 'flex',
      flexDirection: 'column',
      justifyContent: 'center',
      alignItems: 'flex-end',
      marginRight: 10
    },
    button: {
        borderRadius: 0
    }
});

// Then use the styles inside the component where it's needed, like so
const Date = ({ date }) => (
  <View style={styles.date}>
    <Text style={styles.bold}>{date.year}</Text>
    <Text>{date.monthAndDay}</Text>
  </View>
);After applying the styles to every element, you should have a similar look to the final result.
Using custom fonts
However, there’s still one thing missing: the fonts. Adding them is a little bit tricky, but nothing impossible. In React Native, style inheritance is limited. This means you can’t set a global font-family, like you do on the web. Instead, you need to provide the styles individually.
First, run expo install expo-font to add the ability to import fonts, then inside your App.js rewrite the component in the following way:
import React, { useState, useEffect } from 'react';
import { AppLoading } from 'expo';
import { useFonts } from 'expo-font';

import Header from './components/Header';
import List from './components/List';

import Storage from  './Storage';

export default function App() {
    const [checklists, updateChecklists] = useState({});
    const [fontsLoaded] = useFonts({
        'Lora-Regular': require('./assets/fonts/Lora-Regular.ttf'),
        'Lora-Bold':    require('./assets/fonts/Lora-Bold.ttf')
    });

    useEffect(() => {
        const getChecklist = async () => {
            const checklistResponse = await Storage.get();

            updateChecklists(checklistResponse);
        };

        getChecklist();
    }, []);

    if (!fontsLoaded) {
        return <AppLoading />;
    } else {
        return (
            <React.Fragment>
                <Header />
                <List list={checklists} />
            </React.Fragment>
        );
    }
};Import AppLoading and the useFonts hooks and import the fonts, using the hook, starting from line:11. You can get the fonts from Google Fonts. I will also include it among the assets in the GitHub repository.
It’s a common practice to wait for the fonts to be loaded before displaying anything. With an if check at the beginning, you can tell Expo to show the loading screen as long as the fonts are not loaded. And now it’s time to use them.
Inside your Header component, add a titleStyle property to Appbar.Content:
import * as React from 'react';
import { Appbar } from 'react-native-paper';

const Header = () => {
    return (
        <Appbar.Header>
            <Appbar.Content title="Checklists" titleStyle={{ fontFamily: 'Lora-Bold' }} />
            <Appbar.Action icon="plus-circle" />
        </Appbar.Header>
    );
};

export default Header;Repeat the same steps for List. For the styles, change fontWeight to fontFamily instead, and don’t forget to add a rule for the regular version.
const styles = StyleSheet.create({
    regular: {
        fontFamily: 'Lora-Regular'
    },
    bold: {
        fontFamily: 'Lora-Bold'
    },
    ...
});To change the style of the title and the description on each list item, you can use the titleStyle and descriptionStyle properties respectively:
<List.Item
    key={index}
    style={styles.listItem}
    title={checklist.name}
    titleStyle={styles.bold}
    description={`${checklist.items.filter(item => !item.checked).length} item(s) remaining`}
    descriptionStyle={styles.regular}
    left={props => <List.Icon style={styles.listItemIcon} icon={require('../assets/checklist-icon.png')} />}
    right={props => <Date date={checklist.date} />}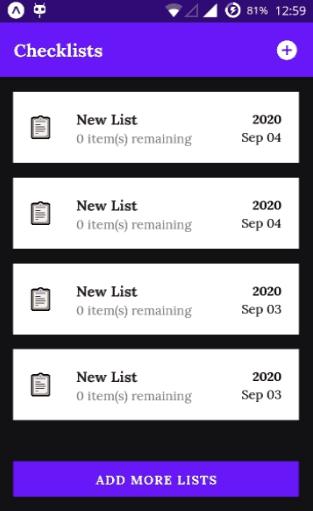
/>And with the fonts in place, everything should start to come together.
Adding Interactions
Let’s move on with adding some interactions to the elements. First, we want to implement the logic for adding new checklists. Remove the temporary mock data from Strorage and open your Header component.
Add a new prop and an onPress property to your Appbar.Action.
import * as React from 'react';
import { Appbar } from 'react-native-paper';

// Destructure `addChecklist` from the props
const Header = ({ addChecklist }) => {
    return (
        <Appbar.Header>
            <Appbar.Content title="Checklists" titleStyle={{ fontFamily: 'Lora-Bold' }} />
            <Appbar.Action icon="plus-circle" onPress={addChecklist} />
        </Appbar.Header>
    );
};

export default Header;We will define this function inside App.js. Open the file and add a new function, which you also pass down to Header. Do the same to the List component and attach an onPress property to the Buttons inside it, the same way we did to Header.
export default function App() {
    ...

    const addChecklist = async () => {
        await Storage.add();
        updateChecklists(await Storage.get());
    };

    ...

    if (!fontsLoaded) {
        return <AppLoading />;
    } else {
        return (
            <React.Fragment>
                {/* Pass down the function to the components */}
                <Header addChecklist={addChecklist} />
                <List list={checklists} addChecklist={addChecklist} />
            </React.Fragment>
        );
    }
};This function will create a new entry and update checklists which will make the List component to rerender.
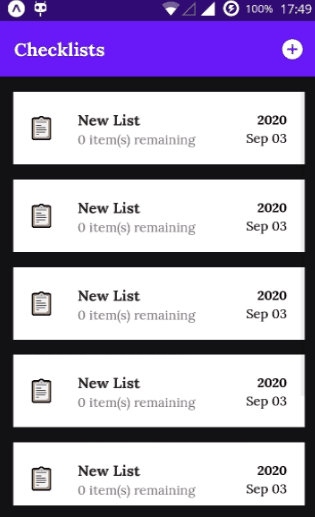
Of course, we didn’t define any add method for Storage yet, so let’s do that now. Extend the Storage object with the following function:
async add() {
    try {
        const state = await this.get();
        const date = new Date();
        const month = monthNames[date.getMonth()];
        const day = ('0' + date.getDate()).slice(-2);

        state.unshift({
            id: ((state[0] || {}).id + 1) || 0,
            name: 'New List',
            date: {
                year: date.getFullYear(),
                monthAndDay: `${month} ${day}`
            },
            items: []
        });

        await AsyncStorage.setItem('@data', JSON.stringify(state));
    } catch (e) {
        // Saving error
    }
}This will get the current state of the app and pushes a new entry into it. Unshifting the array will make sure to place the most recent checklist to the top. To make sure ids are unique, I’ve grabbed the first checklist’s id in the list and added +1 to it. If there are no items yet, the id will fall back to 0. To format the date, I’ve also created an array for the short month names, outside the Storage object.
const monthNames = [
    'Jan',
    'Feb',
    'Mar',
    'Apr',
    'May',
    'Jun',
    'Jul',
    'Aug',
    'Sep',
    'Oct',
    'Nov',
    'Dec'
];With everything in place, you should be able to create new entries by tapping on the buttons.
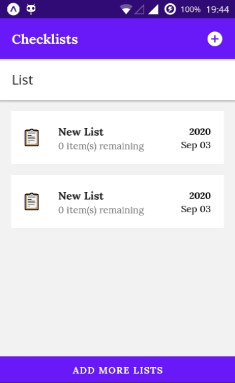
There’s only one problem. You can’t scroll down when there are too many items. To fix it, head over to your List component and change the return statement from View to use ScrollView:
import { Text, View, StyleSheet, ScrollView } from 'react-native';

...

return (
    <ScrollView style={styles.list}>
        {checklists}
        <AddButton />
    </ScrollView>
);To also keep the button visible at all times, you can outsource it outside of the ScrollView:
import { Text, View, StyleSheet, ScrollView } from 'react-native';

...

return (
    <React.Fragment>
        <ScrollView style={styles.list}>
            {checklists}
        </ScrollView>
        {/* Make sure you wrap the button into a View to give it the same margins */}
        <View style={styles.list}>
            <AddButton />
        </View>
    </React.Fragment>
);
How to Add Routing
Now it’s time to implement the details view for each checklist. To do so, however, we need to put some simple routing in place, to change between different views. First, you will have to install a bunch of packages. Copy and paste the following into your console:
npm install @react-navigation/native @react-navigation/stack @react-native-community/masked-view react-native-screens react-native-safe-area-context react-native-gesture-handler react-native-reanimated
The next step is to add some wrapper elements for the routes. Inside the App component, import NavigationContainer and createSackNavigator and create a new stack, by calling the imported function.
import { NavigationContainer } from '@react-navigation/native';
import { createStackNavigator } from '@react-navigation/stack';

const Stack = createStackNavigator();Inside the else path, change the return statement to the following:
const WrappedList = props => <List list={checklists} addChecklist={addChecklist} {...props} />;

return (
    <React.Fragment>
        <Header addChecklist={addChecklist} />
        <NavigationContainer>
            <Stack.Navigator>
                <Stack.Screen name="List" component={WrappedList} />
            </Stack.Navigator>
        </NavigationContainer>
    </React.Fragment>
);The Header can stay outside of the NavigationContainer as that won’t be affected directly by the navigation. The WrappedList is needed for passing additional props created by us. Alternatively, you can also write:
return (
    <React.Fragment>
        <Header addChecklist={addChecklist} />
        <NavigationContainer>
            <Stack.Navigator>
                <Stack.Screen name="List">
                    {props => <List {...props} list={checklists} addChecklist={addChecklist} />}
                </Stack.Screen>
            </Stack.Navigator>
        </NavigationContainer>
    </React.Fragment>
);And this way, you don’t need the extra function. This setup will make it easy to navigate between different components. However, it does two things:
- It breaks the CSS
- It introduces an unnecessary header, called “List”
To fix both of them, add the following prop to Stack.Navigator:
// Import constants at the top of your component
// Contants.manifest will hold the values specified in app.json
import Constants from 'expo-constants';

<Stack.Navigator screenOptions={{ headerShown: false, cardStyle: { backgroundColor: Constants.manifest.backgroundColor } }}>
  ...
</Stack.Navigator>Making the Details View
To change between the views, we need another view. Create a new file under components called Details.js, and add something to display; a button for navigating back:
import React from 'react';
import { Button } from 'react-native-paper';

const Details = ({ navigation }) => {
    return (
        <Button mode="contained" onPress={() => navigation.navigate('List')}>Go back</Button>
    );
};

export default Details;As you can see, we can navigate between different components, by calling navigation.navigate, passing the name of the route. Inside your App component, import Details and add it as a new route to the NavigationContainer.
import Details from './components/Details';

...

return (
    <React.Fragment>
        <Header addChecklist={addChecklist} />
        <NavigationContainer>
            <Stack.Navigator screenOptions={{ headerShown: false, cardStyle: { backgroundColor: Constants.manifest.backgroundColor } }}>
                <Stack.Screen name="List" component={WrappedList} />
                <Stack.Screen name="Details" component={Details} />
            </Stack.Navigator>
        </NavigationContainer>
    </React.Fragment>
);The name you pass to Stack.Screen can be referenced in navigation.navigate.
To be able to go to the details view, add an onPress prop to your List.Items inside your List component.
// Add `navigation` as a prop
const Checklist = ({ list, addChecklist, navigation }) => {
    ...

    const checklists = list.map((checklist, index) => (
        <List.Item
            key={index}
            style={styles.listItem}
            title={checklist.name}
            titleStyle={styles.bold}
            description={`${checklist.items.filter(item => !item.checked).length} item(s) remaining`}
            descriptionStyle={styles.regular}
            onPress={() => navigation.navigate('Details', checklist)}
            left={() => <List.Icon style={styles.listItemIcon} icon={require('../assets/checklist-icon.png')} />}
            right={() => <Date date={checklist.date} />}
        />
    ));

    ...
};Also, pass in the checklist as the second parameter. This will make the checklist available inside the Details component. So far, we only have a button. Let’s add the remaining elements.
Adding the remaining elements
Modify your Details component in the following way, to add the missing elements:
import React from 'react';
import { Text, View, StyleSheet, ScrollView } from 'react-native';
import { Button, Checkbox, List, IconButton } from 'react-native-paper';

const styles = StyleSheet.create({
    regular: {
        fontFamily: 'Lora-Regular'
    },
    bold: {
        fontFamily: 'Lora-Bold'
    },
    remaining: {
        color: '#888888'
    },
    year: {
        fontSize: 16
    },
    strikeThrough: {
        textDecorationLine: 'line-through',
        color: '#888'
    },
    statusBar: {
        backgroundColor: '#FFF',
        display: 'flex',
        flexDirection: 'row',
        paddingHorizontal: 20,
        paddingVertical: 10,
        justifyContent: 'space-between'
    }
});

const Details = ({ route }) => {
    const checklist = route.params;
    const StatusBar = ({ total, remaining, date }) => (
        <View style={styles.statusBar}>
            <View>
                <Text style={styles.regular}>{total} items</Text>
                <Text style={[styles.regular, styles.remaining]}>{remaining} remaining</Text>
            </View>
            <View style={{ alignItems: 'flex-end' }}>
                <Text style={[styles.bold, styles.year]}>{date.year}</Text>
                <Text style={styles.regular}>{date.monthAndDay}</Text>
            </View>
        </View>
    );

    return (
        <React.Fragment>
            <StatusBar date={checklist.date} total={checklist.items.length} remaining={checklist.items.filter(item => !item.checked).length} />
            <ScrollView>
                {checklist.items.map((item, index) => (
                    <List.Item
                        key={index}
                        title={item.name}
                        titleStyle={[styles.regular, item.checked ? styles.strikeThrough : { color: '#FFF' }]}
                        onPress={() => console.log('edit')}
                        left={() => (
                            <View style={{ justifyContent: 'center' }}>
                                <Checkbox status={item.checked ? 'checked' : 'unchecked'} onPress={() => console.log('checked')} uncheckedColor="#FFF" color="#FFF" />
                            </View>
                        )}
                        right={() => <IconButton icon="close-circle-outline" color="#FFF" onPress={() => console.log('delete')} /> }
                    />
                ))}
            </ScrollView>
            <View style={{ margin: 15 }}>
                <Button mode="contained" style={{ borderRadius: 0 }} labelStyle={styles.bold} onPress={() => navigation.navigate('List')}>Add todo</Button>
            </View>
        </React.Fragment>
    );
};
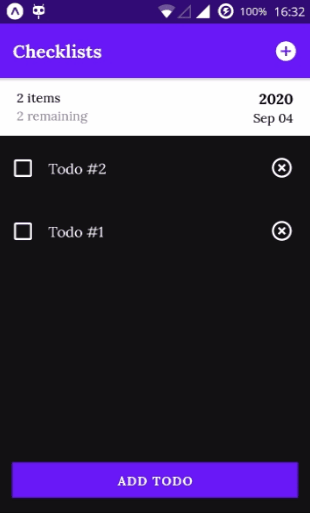
export default Details;On line:33, you can access the passed params with route.params. I’ve outsourced the status bar into a separate component to make the whole file more readable, applied the necessary styles to each element, and finally, added an onPress prop to all interactive elements. I’ve also created some mock data, just so we can verify the styles.
If you run the app inside the browser, you can also see the log messages appearing inside the console. (while on mobile, the messages will appear inside the terminal.)
Adding interactivity to the view
So far, the buttons doesn’t do anything. Let’s change that and add the ability to create, edit and delete todo items.
// Import `useState` at the top of your file
import React, { useState } from 'react';
// Also import storage, so we can sync data
import Storage from  '../Storage';

const Details = ({ route }) => {
    // Move the checklist variable behind a `useState`
    const [checklist, updateChecklist] = useState(route.params);

   ...

    return (
        <React.Fragment>
            <StatusBar date={checklist.date} total={checklist.items.length} remaining={checklist.items.filter(item => !item.checked).length} />
            <ScrollView>
                {checklist.items.map((item, index) => (
                    <List.Item
                        key={index}
                        title={item.name}
                        titleStyle={[styles.regular, item.checked ? styles.strikeThrough : { color: '#FFF' }]}
                        onPress={() => showModal(item)}
                        left={() => (
                            <View style={{ justifyContent: 'center' }}>
                                <Checkbox status={item.checked ? 'checked' : 'unchecked'} onPress={() => markTodo(item.id)} uncheckedColor="#FFF" color="#FFF" />
                            </View>
                        )}
                        right={() => <IconButton icon="close-circle-outline" color="#FFF" onPress={() => deleteTodo(item.id)} /> }
                    />
                ))}
            </ScrollView>
            <View style={{ margin: 15 }}>
                <Button mode="contained" style={{ borderRadius: 0 }} labelStyle={styles.bold} onPress={addTodo}>Add todo</Button>
            </View>
        </React.Fragment>
    );
};Import useState at the top and the Storage we’ve created, then change the console.log callbacks to the one shown above in the code example. Then define these function calls above the return statement:
const updateData = () => {
    updateChecklist({...checklist});
    Storage.set(checklist);
}

const addTodo = () => {
    checklist.items.unshift({
        id: ((checklist.items[0] || {}).id + 1) || 0,
        name: `Todo #${checklist.items.length + 1}`,
        checked: false
    });

    updateData();
};

const markTodo = id => {
    checklist.items = checklist.items.map(item => {
        if (item.id === id) {
            item.checked = !item.checked;
        }

        return item;
    });

    updateData();
};

const deleteTodo = id => {
    checklist.items = checklist.items.filter(item => item.id !== id);

    updateData();
};I’ve outsource the data updating into a separate function as that part is reused in multiple function. It first updates the checklist variable to reflect the current state, then also stores the changes. Notice that you’ll also have to provide a new object each time, otherwise React will not update the view. This is why you need object destructuring.
You might also notice we don’t have a function for editing a todo item. This is because, — you may have seen in the previous code example — we have a showModal function call instead, since we want to edit the items inside a modal.
Displaying information inside a modal
As a next step, it’s time to display the todo’s name inside a modal, so we can actually change it. To be able to work with modals, also import Modal, Portal, Provider and TextInput for the input element, from react-native-paper, and add a couple of new state.
import { Button, Checkbox, List, IconButton, Modal, Portal, Provider, TextInput } from 'react-native-paper';

const Details = ({ route }) => {
    const [checklist, updateChecklist] = useState(route.params);
    const [visible, setVisible] = useState(false);
    const [text, setText] = useState('');
    const [itemID, setItemID] = useState(0);

    const hideModal = () => setVisible(false);
    const showModal = item => {
        setItemID(item.id)
        setText(item.name);
        setVisible(true);
    };

    return (
        <Provider>
            <StatusBar ... />
            <ScrollView>...</ScrollView>
            <View style={{ margin: 15 }}>
                <Button mode="contained" style={{ borderRadius: 0 }} labelStyle={styles.bold} onPress={addTodo}>Add todo</Button>
            </View>

            <Portal>
                <Modal visible={visible} onDismiss={hideModal} contentContainerStyle={{ backgroundColor: '#FFF', margin: 15 }}>
                    <TextInput label="Todo's name" value={text} onChangeText={value => editTodo(value)} />
                </Modal>
            </Portal>
        </Provider>
    );
}Below the “Add todo” button, add a Modal and wrap it inside a Portal. Make sure you also replace React.Fragment to Provider as shown above. The modal will be visible, whenever we click on an item.
It will call the showModal function which sets an ID (the item we are editing), set the value of the input, and also set the modal to visible.
As you can see, here we have an editTodo function which is called, everytime a change is made to the input. Define this function above the return statement as well, next to the other functions.
const editTodo = value => {
    setText(value);

    checklist.items = checklist.items.map(item => {
        if (item.id === itemID) {
            item.name = value;
        }

        return item;
    });

    updateData();
};With this in place, you should now be able to change the name of each todo:
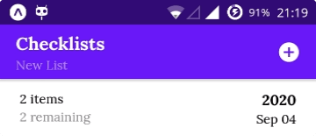
If you go back to the home page, however, the changes are not reflected.
Reflect Changes on Different Routes
To fix this, we need to reset checklist inside the App component to trigger a rerender. Add a new function and pass it down to the Details component:
export default function App() {
    ...
    const refreshChecklist = async () => {
        updateChecklists(await Storage.get());
    };

    ...

    if (!fontsLoaded) {
        return <AppLoading />;
    } else {
        const WrappedList = props => <List list={checklists} addChecklist={addChecklist} {...props} />;
        const WrappedDetails = props => <Details refreshChecklist={refreshChecklist} {...props} />

        return (
            <React.Fragment>
                <Header addChecklist={addChecklist} />
                <NavigationContainer>
                    <Stack.Navigator screenOptions={{ headerShown: false, cardStyle: { backgroundColor: Constants.manifest.backgroundColor } }}>
                        <Stack.Screen name="List" component={WrappedList} />
                        <Stack.Screen name="Details" component={WrappedDetails} />
                    </Stack.Navigator>
                </NavigationContainer>
            </React.Fragment>
        );
    }
}Then inside your Details component, get the prop, and add a useEffect hook after importing it:
const Details = ({ route, navigation, refreshChecklist }) => {
    ...

    useEffect(() => {
        return async () => {
            await refreshChecklist();
        }
    }, []);
};By specifying a return statement, the update will only run once the component unmounts. This way, the changes will be reflected in both views. However, the header still stays the same, so let’s take care of it.
Adding Extra Functionality to Headers
Whenever the user lands inside a checklist, we want to show the name of the checklist below the header’s title. Here we also want to provide buttons to edit and delete the checklist itself. Let’s start with the subtitle.
To show different titles based on different checklists, we will have to rerender the App component, and with it, the Header. We also need to pass the currently selected checklist to the Header, in order to display the correct name. This means, we will need to introduce additional state, that will hold the name based on the active checklist.
However, instead of adding another useState inside the App component, it’s better to extend the existing state. That way, we don’t have to call setState twice, so the app won’t be rerendered twice.
Rewrite the states in your App component, in the following way:
export default function App() {
-   const [checklists, updateChecklists] = useState({});
+   const [data, updateData] = useState({
+       allChecklists: [],
+       selectedChecklist: {}
+   });
    const [fontsLoaded] = useFonts({
        'Lora-Regular': require('./assets/fonts/Lora-Regular.ttf'),
        'Lora-Bold':    require('./assets/fonts/Lora-Bold.ttf')
    });

    const refreshChecklist = async () => {
-       updateChecklists(await Storage.get());
+       updateData({
+           allChecklists: await Storage.get(),
+           selectedChecklist: {}
+       });
    };

    const addChecklist = async () => {
        await Storage.add();
-       updateChecklists(await Storage.get());

+       updateData({
+           allChecklists: await Storage.get(),
+           selectedChecklist: {}
+       });
    };

    useEffect(() => {
        const getChecklist = async () => {
            const checklistResponse = await Storage.get();

-           updateChecklists(checklistResponse);
+           updateData({
+               allChecklists: checklistResponse,
+               selectedChecklist: {}
+           });
        };

        getChecklist();
    }, []);

    ...
};Don’t forget to also pass data.allChecklists instead of checklists down to your List component.
This so far, makes no visible changes, as we haven’t defined a function for changing the selectedChecklist‘s value. Add a new function inside your App component:
const refreshHeader = checklist => {
    updateData({
        allChecklists: data.allChecklists,
        selectedChecklist: checklist
    });
};

...

// Later down in the component, add it as a prop to `List`
const WrappedList = props => <List list={data.allChecklists} addChecklist={addChecklist} refreshHeader={refreshHeader} {...props} />;The function will set selectedChecklist to the object it is passed. Inside the List component, we can pass this object. Add refreshHeader to the list of props and change the onPress property of List.Item in the following way:
const checklists = list.map((checklist, index) => (
    <List.Item
        key={index}
        style={styles.listItem}
        title={checklist.name}
        titleStyle={styles.bold}
        description={`${checklist.items.filter(item => !item.checked).length} item(s) remaining`}
        descriptionStyle={styles.regular}
        onPress={() => {
            refreshHeader(checklist);
            navigation.navigate('Details', checklist);
        }}
        left={() => <List.Icon style={styles.listItemIcon} icon={require('../assets/checklist-icon.png')} />}
        right={() => <Date date={checklist.date} />}
    />
));This means, every time we click on a checklist, it will rerender the app for us, with the correct values for the header. Go back to your App component, and inside the return statement, pass the selectedChecklist down to Header:
return (
    <React.Fragment>
        <Header addChecklist={addChecklist} selectedChecklist={data.selectedChecklist} />
        <NavigationContainer>
            ...
        </NavigationContainer>
    </React.Fragment>
);Now, open up your Header component and add a subtitle prop to Appbar.Content.
import * as React from 'react';
import { Appbar } from 'react-native-paper';

const Header = ({ addChecklist, selectedChecklist }) => {
    return (
        <Appbar.Header>
            <Appbar.Content
                title="Checklists"
                titleStyle={{ fontFamily: 'Lora-Bold' }}
                subtitle={selectedChecklist.name ? selectedChecklist.name : null}
                subtitleStyle={{ fontFamily: 'Lora-Regular', color: '#B180F6' }}
            />
            <Appbar.Action icon="plus-circle" onPress={addChecklist} />
        </Appbar.Header>
    );
};

export default Header;By checking first, if there’s a name for selectedChecklist, we can conditionally display a subtitle.
Adding action buttons inside the header
We also want to change the plus sign, into an edit and delete button. Open the Header component and set the Appbar.Action to the following if-else:
{selectedChecklist.name ? (
    <React.Fragment>
        <Appbar.Action icon="pencil" onPress={toggleInput} color="#FFF" />
        <Appbar.Action icon="delete-forever" onPress={deleteChecklist} color="#FFF" />
    </React.Fragment>
) :
    <Appbar.Action icon="plus-circle" onPress={addChecklist} />
}This will create the edit and delete buttons. Let’s first add the functionality for editing names. Open your Storage and add a new function:
async rename(id, checklistName) {
    try {
        const currentState = await this.get();
        const newState = currentState.map(state => {
            if (state.id === id) {
                state.name = checklistName;
            }

            return state;
        });

        await AsyncStorage.setItem('@data', JSON.stringify(newState));
    } catch (e) {
        // Saving error
    }
}This will except the id of the checklist, as well as a new name. Inside the Header, we will need to introduce some new states, so import useState and useEffect, then add the following functions:
const Header = ({ addChecklist, selectedChecklist }) => {
    const [checklist, setChecklist] = useState(selectedChecklist);
    const [inputVisible, setInputVisible] = useState(false);
    const [text, setText] = useState('');
    const toggleInput = () => {
        setText(selectedChecklist.name);
        setInputVisible(!inputVisible);
    };

    const editChecklist = async value => {
        checklist.name = value;

        setText(value);
        setChecklist(checklist);

        await Storage.rename(selectedChecklist.id, value);
    };

    useEffect(() => {
        setChecklist(selectedChecklist)

        return () => {
            setInputVisible(false);
        }
    }, [selectedChecklist]);

    return (
        <Appbar.Header>
            ...
        </Appbar.Header>
    );
};This will do a couple of things:
- First, it will create a new state based on the passed
selectedChecklist - We’ve also created a flag for toggling the visibility of a text input
- Lastly, a state is required for the input’s value as well.
- The
editChecklistfunction will set the new value for the name, reset the innercheckliststate, as well as rewrite the data toStorage - Lastly, we also need a
useEffecthook to set the state on mount, and hide the input on unmount.
To display the input, change Appbar.Content to the following:
{inputVisible ?
    <TextInput value={text} mode="outlined" style={{ height: 30, flexGrow: 1 }} onBlur={toggleInput} onChangeText={value => editChecklist(value)} /> :
    <Appbar.Content
        title="Checklists"
        titleStyle={{ fontFamily: 'Lora-Bold' }}
        subtitle={checklist.name}
        subtitleStyle={{ fontFamily: 'Lora-Regular', color: '#B180F6' }}
        style={{ paddingLeft: 0 }}
    />
}Don’t forget to also change the value of subtitle to reflect the change instantly.
Removing checklists
Go to your Header component, and define a new function:
const deleteChecklist = async () => {
    await Storage.remove(selectedChecklist.id);

    navigator.current.navigate('List');
};This function is already referenced on the delete button. After the remove, we also want to navigate back to the list, but we don’t have access to the navigator object inside the Header as it sits outside of the navigation stack. To get around this, create a new ref inside your App component, and assign it to the NavigationContainer.
export default function App() {
const navigationRef = React.createRef();
...
return (
<React.Fragment>
<Header addChecklist={addChecklist} selectedChecklist={data.selectedChecklist} navigator={navigationRef} />
<NavigationContainer ref={navigationRef}>
<Stack.Navigator>
...
</Stack.Navigator>
</NavigationContainer>
</React.Fragment>
);
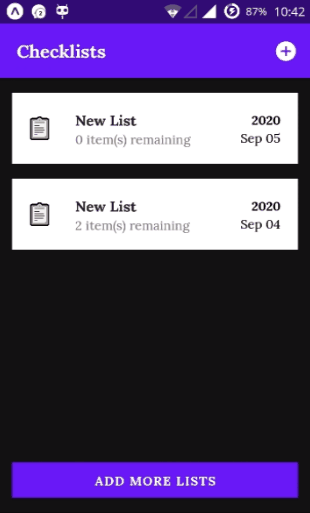
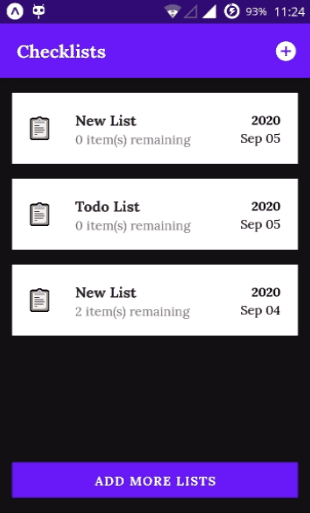
};Also make sure that you pass this new ref as a prop, down to Header. And with that, your very first app is ready to be shipped!
How to Build the App
To start off, you’ll need to configure your app.json. Add a new node called android with a package and versionCode:
"android": {
    "package": "com.webtips.estalista",
    "versionCode": 1
}To start the build process, run expo build:android. You’ll also need to have an Expo account. You can create one through the CLI from your terminal, or from Expo.io.
During the build, you will be prompted to choose between:
apk: A package that you can deploy to the store or install directly to your deviceapp-bundle (aab): An optimized bundle for the store
You can also run expo build:android -t apk or expo build:android -t app-bundle to skip this step.
It is recommended to go with app-bundle. The first time you build it, you will also be asked to provide a keystore. This is used for signing your app on Google Play Store. If you do updates to your app, you need to sign it with the same keystore it was created with. In case you don’t have a keystore, you can let Expo to generate one for you.
If you choose this option, make sure to run expo fetch:android:keystore afterward, and save your credentials to a safe place.
Once everything set up, your app will be queued for build. The status of your app will be reflected in your terminal, but you can also follow the queue on Turtle Queues. For my build, it took around 15 minutes to be queued and built with around ~15 builds waiting in the queue.
Once ready, you can download the build file either from your Expo dashboard or from the link that is provided in your terminal.
Publishing the app
The last step is to publish your app. If this is your first time, you need to publish the app manually through Google Play Console. Note that the registration fee for publishing applications in the app store is $25. Head over to Google Play Console and click on “Create Application”.
In order to be able to publish the app, you will need to fulfill all the checks on the left-hand side menu. To get more information on what is needed to be complete, hover over the checkmarks.

Here you can manage different releases or your app, and even make it only available for internal testing. For the first submission, I also recommend reading through Expo’s step by step tutorial.
Once you published your app, it will get reviewed by Google which can take some time before you actually able to download it.
If you are planning to release for iOS, a full tutorial is available on the official documentation of Expo as always.
What are the Drawbacks of Expo
Expo provides a great and easy way to quickly create mobile application with React Native, without much configuration upfront. Of course this comes at a price.
First off, there are some native APIs that are not supported yet. As Expo handling the compiling and building step, there is a limit on what you can use. For example, if you are planning to use Bluetooth or WebRTC at the writing of this article, you need another solution.
If app size is a priority for you, you may also not be happy with the end result. For a simple todo app, your app size can be as large as 25MB. This is because Expo bundles APIs you not even use. The good side is that above the initial large file size, bundle sizes don’t increase dramatically with additional features.
You also have a limitation on both Android and iOS versions. If you need to support Android below version 5 or iOS below version 10, you need to look elsewhere.
Lastly, as you could see at the end, builds can take more time than usual, because there’s often a queue. If time is a top priority for you, you need to use another solution where you don’t depend on a third party service.
For a more exhaustive list of limitations, I recommend going through the docs of Expo.
What are the alternatives?
So what are the alternatives? Well, you have React Native without Expo. While it requires you to set up additional tools such as Android Studio and additional SDKs, and configure your machine more throughout with environment variables, it does give you more flexibility over building, bundling, and developing process in general.
If you would also like to look into other tools, two common choices are Ionic and NativeScript. Both of them allow you to build mobile application not just with React, but also Angular or Vue.
Summary
Expo is a great way to get your hands dirty in mobile development. It’s easy to use and relatively simple to set up. You can start writing your app in matter of minutes.
Their documentation is in-depth, and if you happen to have a problem, there’s a good chance the community already found a solution for it on GitHub or StackOverflow.
With this simple todo app, you’ve got an introduction to the most common implementation techniques in React Native. As always, there are room for improvements, especially when it comes to performance.
As promised, you can get the full project from my GitHub repository. If you have any questions, don’t hesitate to ask in the comment!
If you would like to try out the app, you can download it from Google Play.
Do you have experience with React Native, Expo, or mobile development in general? Let us know your thoughts in the comments below! Thank you for reading through, happy coding!


Rocket Launch Your Career
Speed up your learning progress with our mentorship program. Join as a mentee to unlock the full potential of Webtips and get a personalized learning experience by experts to master the following frontend technologies:
Courses


Recommended

Core Web Vitals: What Are They and Why You Need to Know About Them?

How to Reliably Check if Adblocker is Enabled