How to Easily Add Emotion Detection to Your App With face-api.js
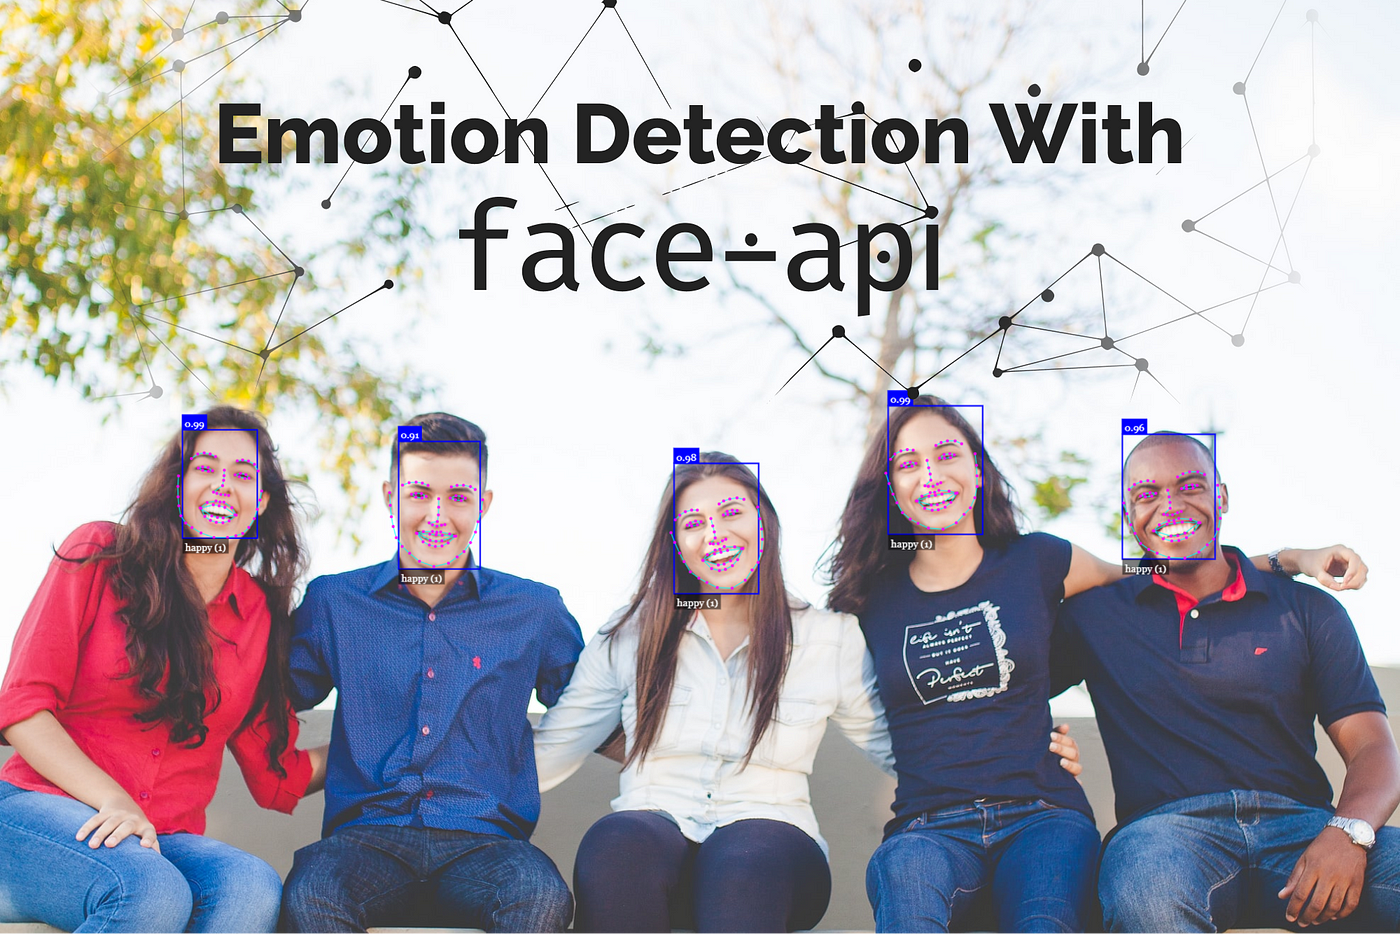
The popularity of image recognition continues to grow as more and more sophisticated tools see the daylight. With advances in AI and computer vision (and the fact that now we have an enormous amount of data available thanks to the internet), now it’s also possible to do face expression recognition inside the browser.
Today, I would like to introduce you to face-api.js, which is a JavaScript face recognition library implemented on top of TensorFlow.js, the popular machine learning library created for JavaScript.
Face-api is super easy to use. It has a powerful API that exposes only the necessary configuration, hiding all the underlying layers, such as actually writing neural nets. Apart from different models of recognition, it also comes with pre-built drawing functions so we don’t have to mess around with a canvas.
In this tutorial, I will cover how you can use it to detect emotions on images. In fact, just to show you how easy it is to implement it using face-api.js, the whole script will be around 20 lines. So let’s jump into it.

Setting Up face-api
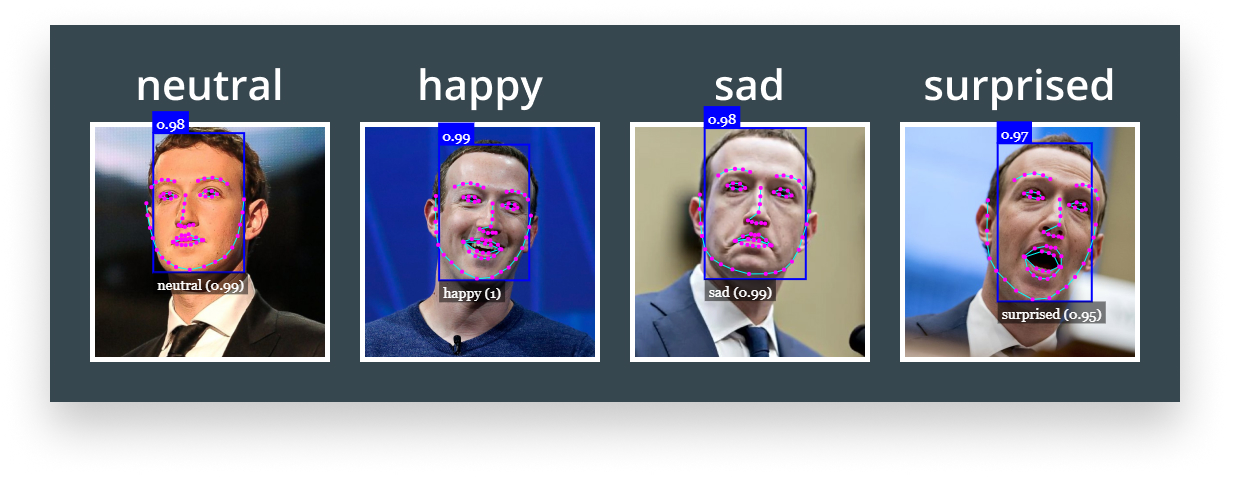
Let’s start with the index file. All we’re going to need is an image we want to work with. I’ve collected some pictures of Mark with different facial expressions. This will be the test subject for the tutorial:

Apart from the image, we will also need to include the face-api library. You can either get it directly from the GitHub repository, or you can run npm i face-api.js in your console. I also created an app.js file where we will interact with the library’s API.
<!DOCTYPE html>
<html lang="en">
    <head>
        <meta charset="UTF-8" />
        <meta name="viewport" content="width=device-width, initial-scale=1.0" />
        <meta http-equiv="X-UA-Compatible" content="ie=edge" />
        <title>Emotion Decetion With face-api.js</title>
        <style>
            body {
                margin: 0;
            }
            canvas {
                position: absolute;
                top: 0;
                left: 0;
            }
        </style>
    </head>
    <body>
        <img src="emotions.jpg" alt="" />
        <script src="face-api.min.js"></script>
        <script src="app.js"></script>
    </body>
</html>
I have the image in the root directory and also added some minor styles. We’re going to draw the detection boxes onto a canvas element. However, we don’t need to create a canvas tag as we are going to create it from the script. By giving it an absolute position, it will be placed on top of the image.
In place of images, face-api supports other media elements for face recognition such as video or canvas. With that set and ready, we can dive into scripting!
Loading the Model
The very first thing we need to do is include the models that will be used for recognition. Create a models folder and download the models from the weights folder in the GitHub repository.

We’re not going to use all of them. You’re only going to need the ssdMobilenetv1, faceLandmark68Net and faceExpressionNet models along with their corresponding shard files. As you can see from the files, the library is also capable of guessing age and gender.
To load the models from JavaScript, add the following to your app.js file:
(async () => {
    await faceapi.nets.ssdMobilenetv1.loadFromUri('/models');
})();The calls are asynchronous, therefore we will need to wrap the whole code into an async IIFE. Alternatively, we could also use promises as we get back a pending promise from loadFromUri. If you’re using it in a node environment, you can also load it directly from the disk using the loadFromDisk method.

Detecting Faces
Next, we will need to get the image and use it for both detection and for creating the canvas from it:
(async () => {
    await faceapi.nets.ssdMobilenetv1.loadFromUri('/models');

    const image = document.querySelector('img');
    const canvas = faceapi.createCanvasFromMedia(image);
    const detection = await faceapi.detectAllFaces(image);
})();Face-api defines some functions for interacting and drawing on a canvas element. createCanvasFromMedia will return a canvas element for us, which can be later inserted into the DOM.
Detecting faces is also asynchronous so we have to use await again. We can either call detectAllFaces or detectSingleFace if we only have one face in an image. By default, these methods utilize the SSD Mobilenet V1 face detector. If you would like to use another model, you can pass it as a second parameter to the method like so:
const detection = await faceapi.detectAllFaces(image, new faceapi.TinyFaceDetectorOptions());Drawing the Detections
To draw the detections on the canvas, we need to define two more variables. Since the display size and the original size of the image can differ, we need to match the dimensions; otherwise, the position of the boxes will be off.
(async () => {
    ...
    const detection = await faceapi.detectAllFaces(image);

    const dimensions = {
        width: image.width,
        height: image.height
    };

    const resizedDimensions = faceapi.resizeResults(detection, dimensions);

    document.body.append(canvas);

    faceapi.draw.drawDetections(canvas, resizedDimensions);
})();Here we get the width and height of the image and pass it into resizeResults alongside the detection. We then add the canvas to the body and draw the detection boxes.
If you’re 100% sure that the display and natural size of the image match, you can leave out the calculations and pass detection directly to thedrawDetections method instead of passing resizedDimensions.
This is only face recognition so far, but we don’t have any emotion associated with the blocks.

Adding Expression and Landmark Detection
To add more detections, we need to load two more models: faceLandmark68Net and faceExpressionNet.
(async () => {
    await faceapi.nets.ssdMobilenetv1.loadFromUri('/models');
    await faceapi.nets.faceLandmark68Net.loadFromUri('/models');
    await faceapi.nets.faceExpressionNet.loadFromUri('/models');

    ...
})();We also need to modify the value of our detection. We need to tell face-api that when detecting faces, also include landmarks and expressions:
(async () => {
    ...
    const detection = await faceapi.detectAllFaces(image)
                                    .withFaceLandmarks()
                                    .withFaceExpressions();

    ...
})();Lastly, we can draw them to the canvas. With everything in place, this is the whole script file:
(async () => {
    await faceapi.nets.ssdMobilenetv1.loadFromUri('/models');
    await faceapi.nets.faceLandmark68Net.loadFromUri('/models');
    await faceapi.nets.faceExpressionNet.loadFromUri('/models');

    const image = document.querySelector('img');
    const canvas = faceapi.createCanvasFromMedia(image);
    const detection = await faceapi.detectAllFaces(image)
                                    .withFaceLandmarks()
                                    .withFaceExpressions();

    const dimensions = {
        width: image.width,
        height: image.height
    };

    const resizedDimensions = faceapi.resizeResults(detection, dimensions);

    document.body.append(canvas);

    faceapi.draw.drawDetections(canvas, resizedDimensions);
    faceapi.draw.drawFaceLandmarks(canvas, resizedDimensions);
    faceapi.draw.drawFaceExpressions(canvas, resizedDimensions);
})();
And now we know how Mark really feels inside. If you would like to get the project as is, visit the faceapi repository I’ve created for this tutorial. Now you can go ahead and start adding senses to your own robot. Happy coding 🤖

Rocket Launch Your Career
Speed up your learning progress with our mentorship program. Join as a mentee to unlock the full potential of Webtips and get a personalized learning experience by experts to master the following frontend technologies:
Courses


Recommended

9 Different Use Cases of console.log
Getting the Best Places in Town With the Google Maps API