How to Make a Real-Time Chat App With Socket.io
Real-time chat applications are surrounding us. If you are using a large social media platform such as Facebook or Twitter, you already use it daily. Messages are sent in an instant and you get real-time feedback. You see your friend is typing on the keyboard and you see it when it stops. You see your tweets getting retweeted and liked as soon as someone hits the button.
In this tutorial, we will explore how you can implement the same functionality. We will look at how you can broadcast messages, how to differentiate between your own and other connections, and how you can give feedback on who is typing at the moment.
It may sound rather complicated without knowing how it works, but in reality, socket.io makes things super convenient for us. To understand the code better, let’s see first does it work.


How Does Real-Time Works?
Socket.io aims to provide a common API — similar to WebSockets — for many different browsers and devices. It creates a connection between clients and the server. At the start of a connection, a simple HTTP handshake is made. If this is successful, the connection is established. If your browser supports WebSockets, this connection is kept open, unlike in traditional HTTP requests where after the response, the connection is closed.
Project Setup
I will keep frameworks and UI libraries out of this tutorial, so we can focus on purely socket.io. Because of this, we will only have two dependencies: socket.io and express. Express is not mandatory, you can implement the same application without it, just like you could implement real-time communication without socket.io. The key here is convenience. We will save time setting up the server by using express. This means your package.json file will look like this:
{
    "name": "real-time-chat-app",
    "version": "1.0.0",
    "dependencies": {
        "express": "4.17.1",
        "socket.io": "1.7.3"
    },
    "scripts": {
        "start": "node server/index.js"
    }
}I have added a start script that will run the index.js file inside the server folder. This is where we will set up express and socket.io from the server side. Apart from this, we will also have a couple of files for the client. Let’s see the project structure:
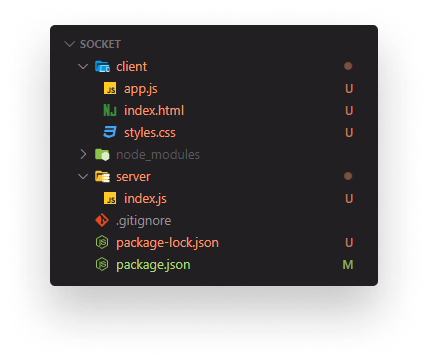
I’ve separated things into a client and server folder. For the server, we’ll only have the previously mentioned index.js. For the client we’ll have:
index.htmlholding the markupstyles.cssresponsible for the stylesapp.jscontaining the script for the interaction
Let’s start setting up the index.html file and see what we have there.

Setting Up the Client
<!doctype html>
<html>
<head>
<title>💬 Real-Time Chat App with Socket.IO</title>
<meta charset="UTF-8" />
<link rel="stylesheet" href="styles.css" />
</head>
<body>
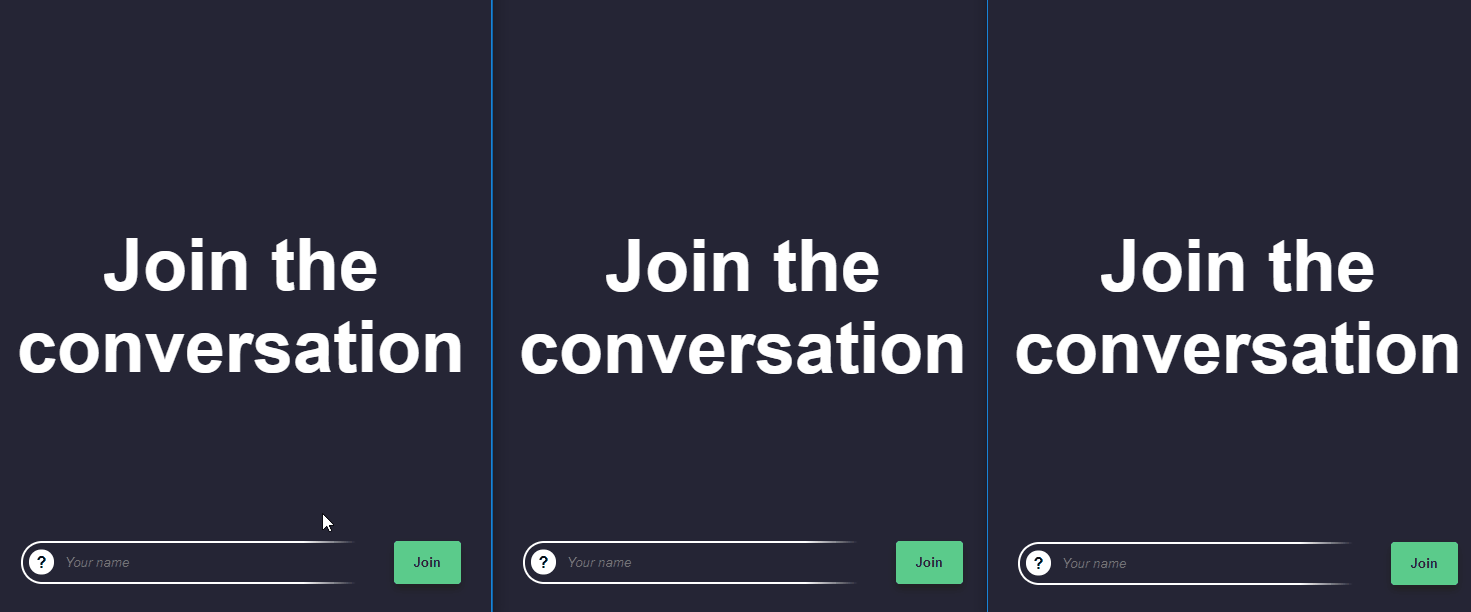
<h1>Join the conversation</h1>
<ul class="feed"></ul>
<form class="messaging-form" action="#">
<span class="feedback"></span>
<div class="message-input">
<span class="avatar">?</span>
<input type="text" class="message-input-field name-input" placeholder="Your name" />
</div>
<button class="join">Join</button>
</form>
<script src="https://cdn.socket.io/socket.io-1.2.0.js"></script>
<script src="app.js"></script>
</body>
</html>
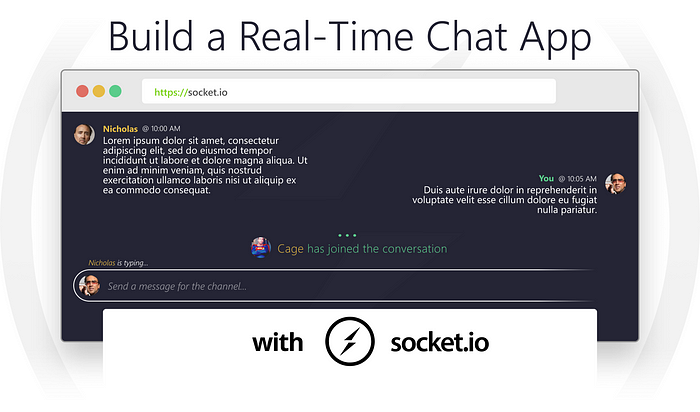
We will welcome the user with a “Join the conversation” header. Every message will go into the feed.
Users will be able to send messages through the messaging-form. The feedback will provide information about who is typing, and the message-input will hold the actual input element for the message. We will also display a random avatar for the user.
Everything is styled with the imported styles.css. If you open the file in your browser, you should see the following:

To work with real-time communication, however, we will need to serve it from a webserver. I will leave out the CSS part from the tutorial, so we can focus on socket.io. To cater to the missing part, I’ve hosted the whole project on a GitHub repository where you can clone the full project.
At the end of the index file, don’t forget to include the client implementation of socket.io and our own script. Now let’s serve this file from the server.
Setting Up the Server
Open up your index.js file inside the server folder and add the following lines:
const express = require('express');
const app = express();
const http = require('http').createServer(app);
const io = require('socket.io')(http);
app.use(express.static(__dirname + '/../client'));
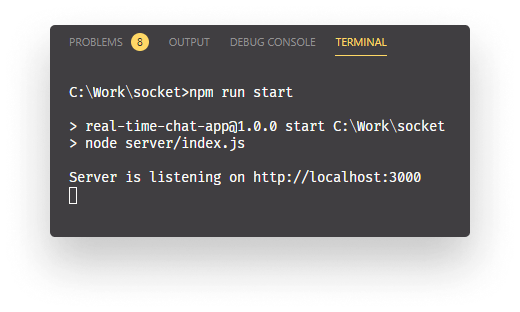
http.listen(3000);
console.log('Server is listening on http://localhost:3000');
io.on('connection', socket => {
console.log('connected...');
});We can create a basic HTTP server, using the built-in http module. We also want to instantiate express (app) and socket.io (io). The socket.io module will take an httpServer as the param. We can then serve the static index.html file using express.static.
Keep in mind that you have to go up one directory because we are running the server from the server folder, but we are using the index file in the client folder.
All that’s left to do is to start the HTTP server with http.listen. As you can see, we also started to listen for the connection with socket.io. If you spin up your server with npm run start and go to localhost:3000, you should see the chat app is served. But if you look at the terminal, all you’ll see is that the server is listening on port 3000. But the “connected…” message — which should be emitted by socket.io — is not shown. This is because we also need to instantiate socket.io on the client side.
Preparing app.js
To fix this, all you have to do is add this one line into your app.js file:
const socket = io();This will load the client socket.io library which exposes an io function. This will make the connection. Now you should see the “connected…” message shown in your terminal. I have also added two other helper objects; one for querying the DOM and another one for holding user information.
const dom = {
    nameInput: document.querySelector('.name-input'),
    joinButton: document.querySelector('.join'),
    inputAvatar: document.querySelector('.messaging-form .avatar'),
    welcomeMessage: document.querySelector('h1'),
    feed: document.querySelector('.feed'),
    feedback: document.querySelector('.feedback')
};

const user = {
    name: null,
    avatar: null
};This way, we will have everything in one place and we can easily configure them later if needed.
Joining the Conversation
The next step is to actually join the conversation. We can do it by adding an event listener for the joinButton:
dom.joinButton.onclick = e => {
    e.preventDefault();

    if (!dom.nameInput.value) {
        dom.nameInput.parentElement.classList.add('error');
    } else {
        enterChannel();
    }
}Don’t forget to call e.preventDefault(), otherwise, it will try to submit the form. I’ve also put some simple validation in place. If the user doesn’t provide a name, let them know it is required.

Otherwise, we call the enterChannel function, to make the user join. Let’s see what is inside of it.
const enterChannel = () => {
    const avatar = getAvatar();
    const name = dom.nameInput.value;

    dom.joinButton.remove();
    dom.welcomeMessage.remove();

    dom.nameInput.value = '';
    dom.nameInput.placeholder = 'Send a message for the channel...';

    dom.inputAvatar.innerText = '';
    dom.inputAvatar.style.backgroundImage = avatar;
    dom.inputAvatar.style.backgroundSize = 'contain';

    user.name = name;
    user.avatar = avatar;

    addWelcomeMessage({ avatar }, true);
};We have a couple of things going on. First, we get the avatar for the user, using a getAvatar function. We also retrieve the name from the input.
Then we need to update the DOM. First, we want to get rid of the join button and the welcome message. We clear the input and change the placeholder to a more appropriate text. Lastly, we set the avatar to the one we’ve retrieved. To later re-use these values, you also want to store them in your user object. We then call another method for adding a welcomeMessage. If you refresh your browser and try to enter the channel, you’ll get an error, however.

We haven’t defined our functions yet, so let’s do that now.
Getting the user’s avatar
In a real-life scenario, you would fetch the data from your API, but for the purpose of this tutorial, we are using a placeholder image service. To also make it a little bit more random — so different users get different avatars — we can use Math.random. This leaves us with the following function:
const getAvatar = () => {
    const size = Math.floor(Math.random() * 100) + 25;

    return `url(https://www.placecage.com/${size}/${size})`;
};We also have another function called addWelcomeMessage, that we need to take care of. This will handle writing out a message on who has joined the conversation.
Adding welcome messages
This function will take a user object — consisting of a name and an avatar — and an optional flag, that decides if the one who joined the channel is you.
const addWelcomeMessage = (user, you) => {
    const welcomeMessage = document.createElement('li');
    const message = you ?
        'You have joined the conversation' :
        `<span class="user-name">${user.name}</span> has joined the conversation`;

    const avatar = you ? '' : `<span class="avatar" style="background: ${user.avatar}; background-size: contain;"></span>`;

    welcomeMessage.classList = 'welcome-message';
    welcomeMessage.innerHTML = `
        <hr />
        <div class="welcome-message-text">
            ${avatar}
            ${message}
        </div>
    `;

    dom.feed.appendChild(welcomeMessage);
};This way, we can display different messages based on who is joined. We want to go with two copies based on the client:
- “You have joined the conversation”
- “
<username>has joined the conversation”
All this function does is appending an li to the feed. If you try to join the conversation now, you should see the following:

Emitting the First Event in Socket
Everything is working as expected, except — if you open another tab, nothing happens there. Even though it should say “Nick has joined the conversation”.

This is because we haven’t sent any events to the server yet. To emit an event, add the following lines to the end of your enterChannel function:
socket.emit('user connected', {
    name,
    avatar
});This will let socket.io know that a user has connected. Emitting an event takes two parameters:
- The name of the event which can be an arbitrary string
- An optional payload will be sent to the server. In our case, we want to send the
nameand theavatarof the user, so we can later show for others, who are connected.
To handle this event on the server, go to your server/index.js file and inside io.on, add a socket.on call with the same event name.
const users = {};

io.on('connection', socket => {
    console.log('connected...');

    socket.on('user connected', payload => {
        users[socket.id] = {
            id: socket.id,
            name: payload.name,
            avatar: payload.avatar
        };

        socket.broadcast.emit('user connected', users[socket.id]);
    });
});I have also created a users object which holds information about all connected users. Here we can reference the payload that we’ve sent from the client. This event will create a new user object on the server using the socket’s id. The socket id is unique, so we don’t have to worry about generating unique ids for each user. Lastly, we want to broadcast this event back to the client, so we can update the chat.
Just as socket.emit on the client, socket.broadcast.emit on the server takes in an event name and an optional payload. We send back an event with the same name we have received from the client, and we also want to send back the user’s information, so we’ll know who is connected.
You can name the event you send back as anything else, it doesn’t have to have the same name it receives from the client.
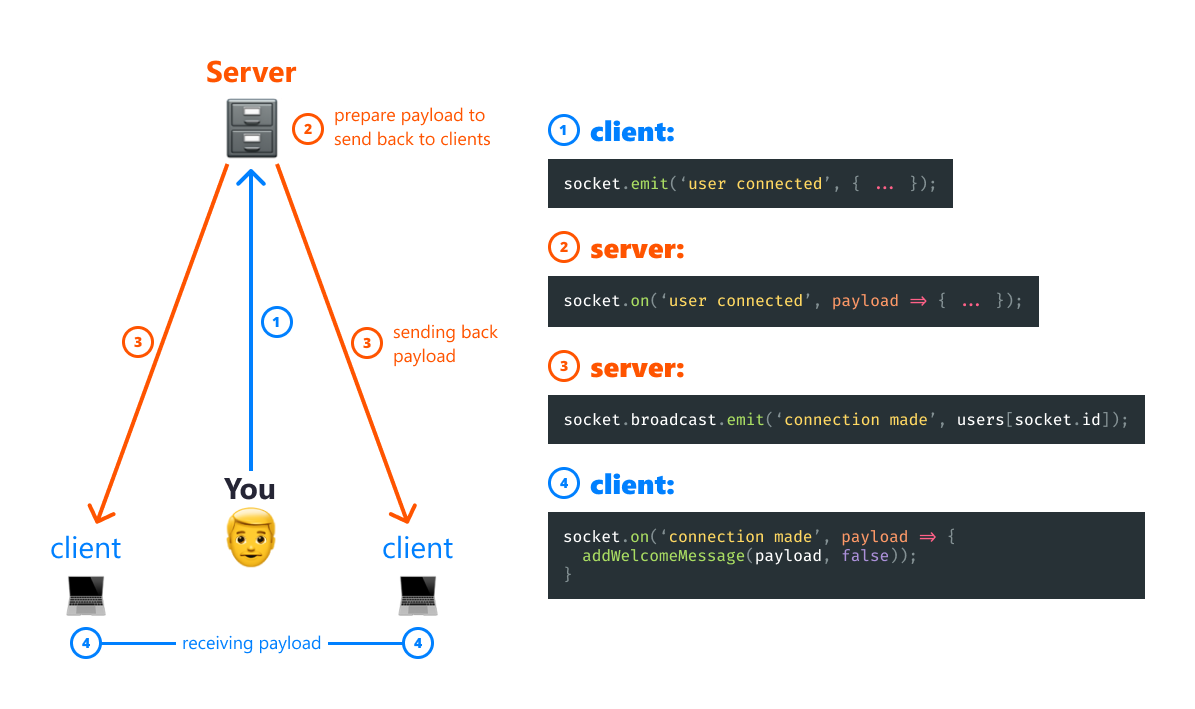
Note that socket.broadcast.emit will only send back the event to all connected clients, except yours. This is perfect as we don’t want to show a “<username> has joined the conversation” message on our side. Rather we want to show “You have joined the conversation”. If you also want to broadcast to the client where the event is originating from, you can use socket.emit, just like we did on the client-side.
Reacting to the event on the client-side
Now we need to update the chat. To react to this event, we want to add a block similar to the one on the server:
socket.on('user connected', payload => addWelcomeMessage(payload, false));We call the same addWelcomeMessage function, except this time, the second parameter is false. As the one who is joined the channel is not your client.

“Several people are typing…”
We can also easily implement a function to show who is typing, by sending an event to the server on each keystroke. Modify the onclick listener in joinButton the following way:
dom.joinButton.onclick = e => {
   e.preventDefault();

    if (!dom.nameInput.value) {
        dom.nameInput.parentElement.classList.add('error');
    } else {
        enterChannel();

        dom.nameInput.onkeyup = e => {
            socket.emit('user typing');

            if (e.target.value === '') {
                socket.emit('user stopped typing');
            }
        };
    }
}After entering the channel, we can add an onkeyup event listener and emit an event, each time a key is pressed. If the input is empty, we also want to emit an event to let the server know, someone has stopped typing. To handle these events on the server, extend io.on with the following function calls:
const typers = {}

io.on('connection', socket => {
    ...

    socket.on('user typing', () => {
        typers[socket.id] = 1;

        socket.broadcast.emit('user typing', {
            user: users[socket.id].name,
            typers: Object.keys(typers).length
        });
    });

    socket.on('user stopped typing', () => {
        delete typers[socket.id];

        socket.broadcast.emit('user stopped typing', Object.keys(typers).length);
    });
});I have defined another object, outside the io.on which is responsible for holding information about who is typing. Using the unique socket id, we can add a new entry to the object when someone starts typing. This way, we can ensure that only one entry exists per user inside the object. This is important as we will get the length of the object in line:11, to let the client know the number of people who are typing. We can also get their name since they are stored in the user object.
Just like for the “user connected” event, we broadcast the same event back to the client. Each time, passing the number of types. When someone stops typing, we can remove the property from the object. This happens on line:16.
Back in our client, we need to listen to these events.
socket.on('user typing', ({ user, typers }) => {
    dom.feedback.innerHTML = typers > 1 ? 'Several people are typing' : `<i>${user}</i> is typing`;
});

socket.on('user stopped typing', typers => {
    if (!typers) {
        dom.feedback.innerHTML = '';
    }
});Based on the number of typers that the server sends us, we can display either who is typing or that several people are typing. If no typers are left, we can empty the DOM.
Sending Messages
Only one thing left to do. Sending the messages. Inside your onkeyup event listener, add the following if block:
dom.nameInput.onkeyup = e => {
    socket.emit('user typing');

   // If user presses enter
   if (e.keyCode === 13) {
        const message = e.target.value;

        socket.emit('send message', {
            message,
            user
        });

        addEntry({ user, message }, true);

        e.target.value = '';
    }

    if (e.target.value === '') {
        socket.emit('user stopped typing');
    }
};This will check if the user presses enter. We emit an event with the user object as well as the message and add an entry to the feed using the addEntry function. Lastly, we can clear out the input field. So what does the addEntry function does? It adds an li to the feed in form of a message.
const addEntry = ({ user, message }, you) => {
    const entry = document.createElement('li');
    const date = new Date();

    entry.classList = `message-entry${you ? ' message-entry-own' : ''}`
    entry.innerHTML = `
        <span class="avatar" style="background: ${user.avatar}; background-size: contain;"></span>
        <div class="message-body">
            <span class="user-name">${you ? 'You' : user.name}</span>
            <time>@ ${date.getHours()}:${date.getMinutes()}</time>
            <p>${message}</p>
        </div>
    `;

    dom.feed.appendChild(entry);
};It takes in two parameters, similar to the addWelcomeMessage function:
- An object with the user and their message
- A flag to decide whether the message is coming from you. We will need this for different formatting as well as deciding the user’s name.
Just as for the other events, we need to handle this on the server as well.
io.on('connection', socket => {
    ...

    socket.on('send message', payload => {
        delete typers[socket.id];

        socket.broadcast.emit('send message', {
            user: payload.user,
            message: payload.message,
            typers: Object.keys(typers).length
        });
    });
});The socket will broadcast the same event back to the connected clients with the user, their message, and the number of people who are typing. We can simply reuse the addEntry function on the client to add the message to the feed.
socket.on('send message', payload => {
    addEntry(payload);

    if (!payload.typers) {
        dom.feedback.innerHTML = '';
    }
});All that’s left to do, is to test everything out.
Summary
You’ve just created your very first real-time chat application. Once you get how data flows in real-time applications, socket.io makes it super easy to create powerful apps.
If you would like to learn more, their documentation is full of examples. I have also hosted the project on GitHub if you would like to see the whole application in one piece.
Thank you for taking the time for reading this article, happy coding!

Rocket Launch Your Career
Speed up your learning progress with our mentorship program. Join as a mentee to unlock the full potential of Webtips and get a personalized learning experience by experts to master the following frontend technologies:
Courses


Recommended

How to Make a Download Progress Bar in React

How to Make an Animated Progress Bar in CSS