How to Make Your First Chrome Extension With JavaScript
One of the best advantages of being a developer is that you can create your own set of tools to optimize your workflow. Creating chrome extensions is no exception from this. We all use some from our day-to-day basis — probably most of you reading this article with an ad blocker installed — but some of us have special workflows for which we don’t have appropriate tools.
Creating them is not much hassle; You make it once, use it forever. The amount of time they can save is invaluable, so I decided to give it a go and write a tutorial about it. They are built using existing web technologies such as HTML, CSS, and JavaScript which means you don’t need to learn anything new, apart from what are the key components in a Chrome extension.

The Extension We Will Create
I’ve created some simple designs in Figma. The extension can be used to import ingredients from Tasty, which you can later use in your shopping list. I chose this example so we can see how to implement a popup with various UI elements with the logic behind it.
We will also have a look at how we can interact with the current page to do DOM manipulation through the use of content scripts. Last but not least, we will see how we can store information inside our extension for later use.


The extension will work in the following way:
- First, we want to check if the user is on the correct website. In case they are not, we will display a message to them to visit a recipe in order to start importing.
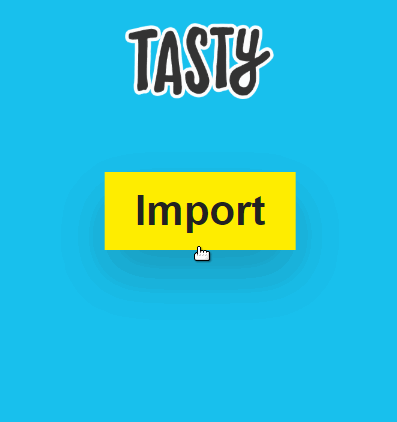
- If they are on the correct site, we present the user with an import button that will fetch the ingredients from the page and creates a checklist.
If you would like to get the project in one go, you can clone it from GitHub.
Setting up the Chrome Extension
To get started, create an empty directory that will hold all the required files for the extension. All extensions need to have a manifest.json file. This is a configuration file that will hold information about our extension, such as the file used for the popup window, the scripts we are using for it, or even the permissions we want to request for the extension.
{
"manifest_version": 2,
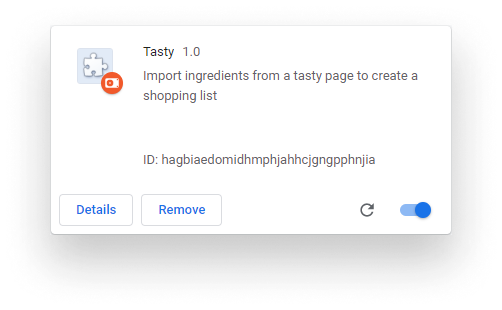
"name": "Tasty",
"description": "Import ingredients from a tasty page to create a shopping list",
"version": "1.0"
}We can get away using only four properties initially. At this stage, we can already import the extension to Chrome so we can check any further updates.
To do so, navigate to chrome://extensions and enable developer mode, then click on the “Load unpacked” button and select the folder of the extension to import it.

The extension is now installed and you should see a new icon appearing next to the address bar. Right at this stage, it looks pretty boring. We have the name, the version, and the description displayed, but we don’t have an icon, so let’s add that right now.
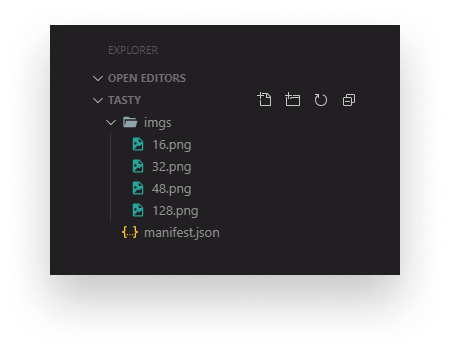
Create four different sized png icons: 16x16px, 32x32px, 48x48px and 128x128px. You can do it with the help of online tools or with your favorite design tool. I use Figma throughout this tutorial. Create an imgs folder for them and pull it into your project. Now you should have a folder structure similar to the following:
To use the images in the extension, we can expand the manifest.json file with an icons property, holding the references to them:
{
    "manifest_version": 2,

    "name": "Tasty",
    "description": "Import ingredients from a tasty page to create a shopping list",
    "version": "1.0",

    "icons": {
        "16": "imgs/16.png",
        "32": "imgs/32.png",
        "48": "imgs/48.png",
        "128": "imgs/128.png"
    }
}If you go back to the extensions tab and refresh the extension, you’ll see we have an icon now.

Adding The HTML Popup
With everything set up, let’s add the user interface to the extension. Create a popup.html file in the root of your project. Just as for the images, we need to reference it in the manifest.json file:
"browser_action": {
    "default_popup": "popup.html"
}This can be done by adding the browser_action property. The popup.html holds all of the UI elements displayed in the extension. Right at this stage, it only includes a generic message for all sites:
<!DOCTYPE html>
<html>
    <head>
        <meta charset="UTF-8" />
        <meta name="viewport" content="width=device-width, initial-scale=1.0" />
        <meta http-equiv="X-UA-Compatible" content="ie=edge" />
        <title>Tasty</title>
        <link rel="stylesheet" href="css/app.css" />
    </head>
    <body>
        <img src="imgs/tasty.svg" class="logo" />
        <div class="disclaimer">
            To start importing<br />
            visit a recipe on
            <strong>Tasty</strong>
        </div>

        <div class="shopping-list hidden">
            <h1 class="recipe-name"></h1>
            <button class="import">Import</button>
            <ul class="ingredients"></ul>
            <button class="clear hidden">Clear</button>
        </div>
    </body>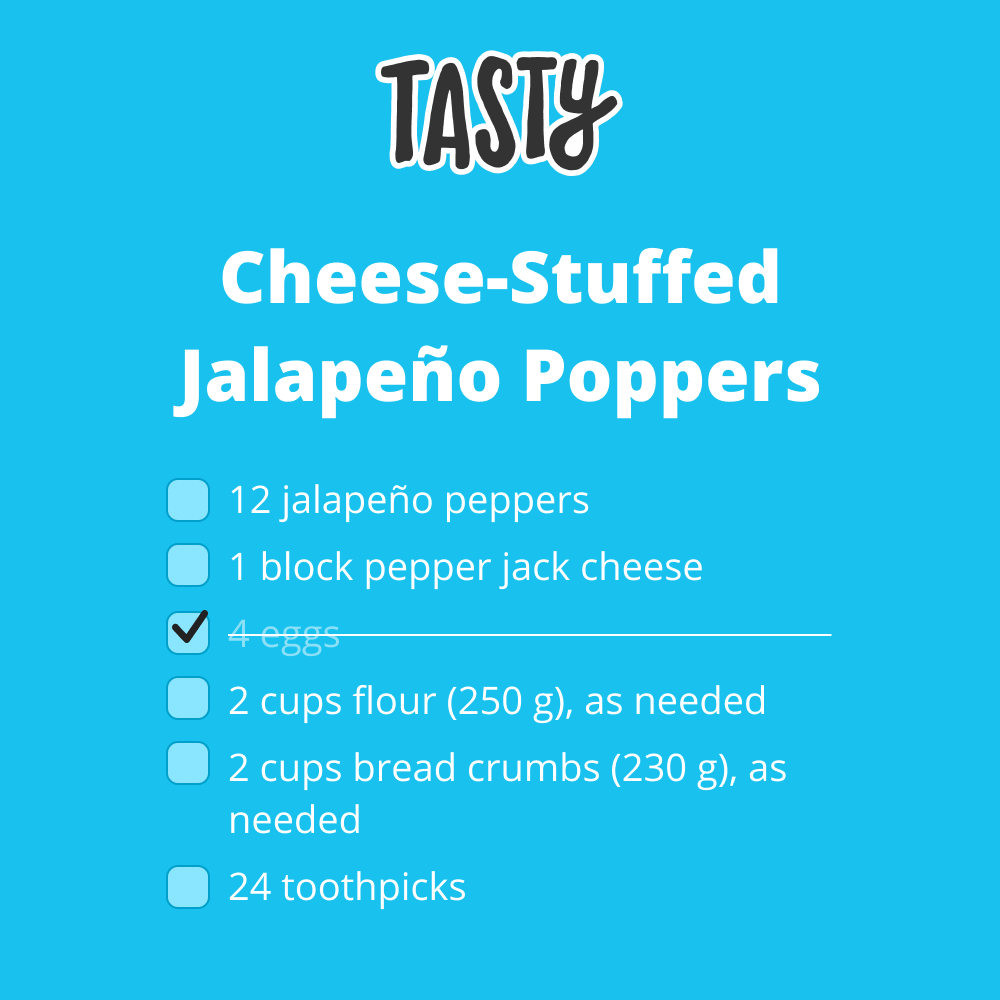
</html>This is all the HTML we will need. For the styles, I’ve created a css folder and put all my rules into the app.css file. The shopping list — which holds the name of the recipe, the import button, and the ingredients — is hidden through CSS.
Once we are on the right page, we will show them to the user. The recipe’s name and its ingredients are also empty as they will be populated through JavaScript.
Showing The Import Button
Right now, even if you are on Tasty.co, the same message is shown to the user. We want to hide the disclaimer and show the import button if the user is viewing a recipe.
To do so, we need to add a script to our popup.html file. Create an app.js in your root directory and reference it inside popup.html, right before the closing of the body tag.
<script src="app.js"></script>We’re going to be using the chrome.tabs API. To have access to everything, we need to request permission for it, which we can do in our manifest.json file. Expand it with the following line:
"permissions": ["tabs"]Now we can start writing out the functionality for showing the import button to the user:
chrome.tabs.getSelected(null, tab => {
    if (tab.url.includes('tasty.co/recipe')) {
        document.querySelector('.disclaimer').classList.add('hidden');
        document.querySelector('.shopping-list').classList.remove('hidden');
    }
});We use the getSelected method of the chrome.tabs API which returns the currently active tab. If the tab URL matches the path we defined on line:2, we hide the disclaimer and show the shopping list to the user. After you’ve made the changes, remember to refresh the extension to see the results.
Content Scripts: Pulling In Ingredients
By clicking the button, we would like to get the list of ingredients from the page and populate the ingredients node inside our extension. As you can see from the code example above, the document node represents the HTML of the extension and not the document of the page. To get around this, we will use content scripts.
Content scripts have access to the page’s DOM but have no access to the extension’s HTML.
Extensions in Chrome are event-based, so to make things work when the user clicks the import button, we need to:
- Send a message to the content script telling it to fetch the ingredients
- Get the ingredients from the DOM inside the content script
- Send the response back to our
app.js - Populate the shopping list with the retrieved data
It may sound overly complicated at first but bear with me, each step can be done with only a couple of lines.
To add a content script, navigate back to your manifest.json and extend it with the content_scripts node:
{
    "manifest_version": 2,

    "name": "Tasty",
    "description": "Import ingredients from a tasty page to create a shopping list",
    "version": "1.0",

    "icons": {
        "16": "imgs/16.png",
        "32": "imgs/32.png",
        "48": "imgs/48.png",
        "128": "imgs/128.png"
    },

    "browser_action": {
        "default_popup": "popup.html"
    },

    "content_scripts": [
        {
            "matches": ["https://tasty.co/recipe/*"],
            "js": ["contentScript.js"]
        }
    ],

    "permissions": ["tabs"]
}This is how our manifest.json file looks like. The content_scripts property takes in an array of objects with two properties:
matchestells the extension where to inject the script into the pagejstells the extension which files to inject into the page
Inside the matches property we can use regexes. With * we tell it to match for every page that starts with tasty.co/recipe/. Inside the js property, we are referencing contentScript.js, so create that in your root directory.
If everything is done correctly, you should see your content script loaded only for recipe pages inside Tasty. To debug content scripts, inspect the page and go to your “Sources” tab, then change “Page” on the left-hand side to “Content scripts”. There you will see your extension.
Inside contentScript.js we are going to add a listener for the event when the user clicks the import button:
chrome.runtime.onMessage.addListener((request, sender, sendResponse) => {
    if (request.action === 'fetchIngredients') {
        const recipeName = document.querySelector('.recipe-name').innerText;
        const ingredients = Array.from(document.querySelectorAll('.ingredient')).map(ingredient => ingredient.innerText);

        sendResponse({ recipeName, ingredients });
    }
});To add the event listener we use chrome.runtime.onMessage.addListener. Inside its callback, we check if the request is coming from our app, and if it does, we send back the name of the recipe alongside the ingredients in an object.
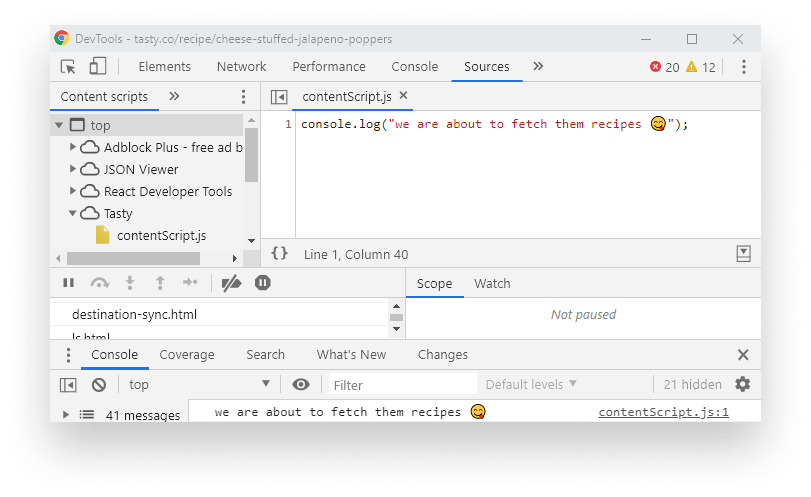
To send this event, we need to go back to our app.js file and add the event listener to our button.
document.querySelector('.import').addEventListener('click', () => {
    chrome.tabs.sendMessage(tab.id, { action: 'fetchIngredients' }, response => {
        console.log(response);
    });
});Here we use chrome.tabs.sendMessage with the id of the current tab and the same action we are listening for inside contentScript.js. After extending app.js with the lines above, clicking on the import button should grant you the information we are longing for:
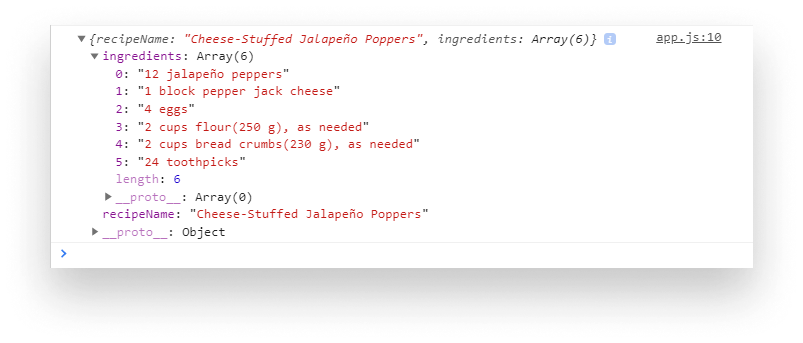
All that’s left to do for us is populating the DOM inside the extension with the information we got from our content script.
Populating The Extension With The Ingredients
Inside chrome.tabs.sendMessage when the response comes back, we want to populate the extension with the title and the ingredients. Starting with the title we can get it done using one single line:
document.querySelector('.recipe-name').innerText = response.recipeName;Doing the ingredients will be a little bit more tricky but nothing impossible. Since we have multiple elements, we need to loop over them. We will also have checkboxes inside the list item so we need to create additional DOM elements as well.
const ingredientsList = document.querySelector('.ingredients');

response.ingredients.forEach(ingredient => {
    const listItem = document.createElement('li');
    const checkbox = document.createElement('input');

    checkbox.type = 'checkbox';

    listItem.appendChild(checkbox);
    listItem.appendChild(document.createTextNode(ingredient));

    ingredientsList.appendChild(listItem);
});Here we first get the .ingredients list, we want to query it only once before the loop. Next, we loop over response.ingredients using forEach. Inside each ingredient, we create the li and the input, we set the type for the input, and append the checkbox to the list item and the name of the ingredient after. Then we append the whole thing to the ul.
Last but not least, we can hide the import button to prevent the user from importing the same list again and again.
document.querySelector('.import').classList.add('hidden');Now if we refresh the extension and test it out on a site, you should see the ingredients getting pulled in. But if we try to check one of the items, nothing happens. That’s because we haven’t attached any listener to the checkboxes yet.

Checking The Checkboxes
To add the functionality to the checkboxes, let’s create an event listener next to the import buttons event listener. However, we can’t just attach listeners to the li elements, as initially, they don’t exist in the DOM. Instead, we can attach an event listener to the parent container which is the ul.
document.querySelector('.ingredients').addEventListener('click', e => {
    if (e.target.nodeName === 'INPUT') {
        if (e.target.checked) {
            e.target.parentElement.classList.add('checked');
        } else {
            e.target.parentElement.classList.remove('checked');
        }
    }
});To check whether the input has been clicked inside the list item we can check for e.target.nodeName. Giving the items a strike-through is just a matter of switching a class based on whether the checkbox is checked or not:
Storing Previously Fetched Data
Of course, when we close the extension and reopen it later, we need to import the same recipes again as everything is lost. To get around this, let’s add some functionality to store previously imported data. For that, we’re going to use the storage API, so we need to request permission for it in our manifest.json:
"permissions": [
    "tabs",
    "storage"
]To store the response returned from the content script, we can call storage.sync.set after we clicked the import button and the response is returned:
chrome.storage.sync.set({ response }, () => {});To retrieve the response, we can call storage.sync.get right after we check if we are on Tasty.co. Since we would populate the same way we do for the import button, we can extract the code into a function and call it for both importing and storage.sync.get.
chrome.storage.sync.get(['response'], (result) => {
    populateIngredients(result.response);
});

document.querySelector('.import').addEventListener('click', () => {
    chrome.tabs.sendMessage(tab.id, { action: 'fetchIngredients' }, response => {
        populateIngredients(response);
    });
});We can also introduce a clear button that calls storage.sync.clear to get rid of previously-stored data:
document.querySelector('.clear').addEventListener('click', () => {
    chrome.storage.sync.clear();
});This is how our whole app.js file will look in the end, with everything in place:
const populateIngredients = (response) => {
    document.querySelector('.recipe-name').innerText = response.recipeName;

    const ingredientsList = document.querySelector('.ingredients');

    response.ingredients.forEach(ingredient => {
        const listItem = document.createElement('li');
        const checkbox = document.createElement('input');

        checkbox.type = 'checkbox';

        listItem.appendChild(checkbox);
        listItem.appendChild(document.createTextNode(ingredient));

        ingredientsList.appendChild(listItem);
    });

    document.querySelector('.import').classList.add('hidden');
    document.querySelector('.clear').classList.remove('hidden');

    chrome.storage.sync.set({ response }, () => {});
}

chrome.tabs.getSelected(null, tab => {
    if (tab.url.includes('tasty.co/recipe')) {
        document.querySelector('.disclaimer').classList.add('hidden');
        document.querySelector('.clear').classList.add('hidden');
        document.querySelector('.shopping-list').classList.remove('hidden');

        chrome.storage.sync.get(['response'], (result) => {
            populateIngredients(result.response);
        });

        document.querySelector('.import').addEventListener('click', () => {
            chrome.tabs.sendMessage(tab.id, { action: 'fetchIngredients' }, response => {
                populateIngredients(response);
            });
        });

        document.querySelector('.clear').addEventListener('click', () => {
            chrome.storage.sync.clear();

            document.querySelector('.disclaimer').classList.remove('hidden');
            document.querySelector('.shopping-list').classList.add('hidden');
        });

        document.querySelector('.ingredients').addEventListener('click', e => {
            if (e.target.nodeName === 'INPUT') {
                if (e.target.checked) {
                    e.target.parentElement.classList.add('checked');
                } else {
                    e.target.parentElement.classList.remove('checked');
                }
            }
        });
    }
});Summary
We looked at how we can initialize a Chrome extension with a manifest file, how we can request permissions to various APIs such as tabs or storage, and we also looked at creating a popup from scratch and using content scripts to retrieve data from a website.
If you would like to tweak around with the project in one piece — with CSS included — you can clone the full source code from GitHub.
This is just the tip of the iceberg. If you would like to learn more, the official Chrome documentation is pretty extensive. You can find different pages for the different APIs. I would like to encourage you to take a look around and experiment with different setups and try to extend the chrome extension created in this tutorial with extra functionality. 🌶️
Have you worked with Chrome extensions before? Do you have questions or concerns? Let us know your thoughts in the comments down below!
If you think a Chrome extension would be an overkill for your solution, you might also want to check out how to create bookmarklets:

Rocket Launch Your Career
Speed up your learning progress with our mentorship program. Join as a mentee to unlock the full potential of Webtips and get a personalized learning experience by experts to master the following frontend technologies:
Courses


Recommended
Recreate Breakout with Emojis in JavaScript
Learn How to Easily Make Bookmarklets