Building Scalable APIs With NestJS and MongoDB
Building scalable server-side applications that are both easy to maintain and read, can be a non-trivial task when it comes to large-scale applications. It requires a robust, but flexible project structure with consistent code, otherwise, we may end up with a project that is hard to extend and manage.
Because of these reasons, we will be looking into a progressive Node.js framework called NestJS for building scalable server-side applications.

Why Nest?
So why Nest? What is in it for us? NestJS — as we will see — is a highly modular Node.js framework for building modern backend applications. It combines multiple programming paradigms into a predefined project structure, unlike many other backend frameworks.
This eliminates the need to start from scratch and come up with your own setup and project structure. On the other hand, if you feel uncomfortable with how files are organized, you can always rearrange your modules until it feels right.
It comes with TypeScript, but you also have the option to use vanilla JavaScript. Its architecture is heavily inspired by Angular, so if you have hands-on experience with that, you will quickly get a grasp of it.
What Are We Building?
To stay true to the nature of Nest, we are going to build a CRUD application for querying, creating, modifying, and removing entries about cats through an API.
We will also look into how you can integrate GraphQL for writing better queries, and how you can connect all of this together to a MongoDB. Without any further ado, let’s jump into it.

The Building Blocks of Nest
First, let’s look into what are the building blocks of Nest to get more familiar with the framework. It is built around modules that are managed by controllers and services.
Modules
Modules are a core part of NestJS. The main job of a module is to split your codebase into smaller, more manageable pieces. Each module is made up of controllers, services, resolvers, or other modules. Even the root of your application uses a module.
@Module({})
export class AppModule {}Although you could build your whole app around one module, it is not something you would want to do if you are thinking in large-scale. And speaking of large-scale, if you are building a small application, then NestJS might be overkill for you.
Controllers
Controllers in Nest are responsible for handling incoming HTTP requests. Whenever a user hits one of your API’s endpoints, the request goes through one of the methods of a controller to send the appropriate response.
import { Controller } from '@nestjs/common';

@Controller()
export class AppController {}Since we are going to work with GraphQL, we will be using a resolver instead, but the behavior will be the same.

Services
While you could technically start building applications with the two above, to further break things down, NestJS uses services for holding most of the business logic associated with your endpoints. That way, you essentially only return the methods of services from your controllers, and you avoid writing unnecessary logic for them. Instead, they will be part of a service.
import { Injectable } from '@nestjs/common';

@Injectable()
export class AppService {}This is the main purpose of a service: to extract complex business logic from controllers. All of these building blocks are put together by NestJS’ dependency injection.

Setting Up the Project
To get our hands dirty, let’s quickly set up a new NestJS project. Luckily for us, NestJS provides a handy CLI that can be used to pre-generate new projects. I highly recommend using it. You can get it installed on your machine by running:
npm i -g @nestjs/cli
And with the CLI installed, you can bootstrap a new project using the nest new command through your terminal:
nest new nest-mongo-graphql
where the name after the new keyword references a folder name. During the scaffolding, Nest will ask you whether you want to use Node.js or Yarn as the packager manager. For this tutorial, we are going with Node.

After the installation has finished, open up your folder, and let’s discover what NestJS provides us as a starting point. What we are interested in, is the src folder. By default, it comes with 5 different files:
main.ts
import { NestFactory } from '@nestjs/core';
import { AppModule } from './app.module';

async function bootstrap() {
    const app = await NestFactory.create(AppModule);
    await app.listen(3000);
}

bootstrap();Your main.ts file is what bootstraps the whole NestJS application. This is your entry file. It calls the core NestFactory function to create a Nest application instance from a module that you pass to it. Then it starts up a server at port 3000 to listen for HTTP requests.
app.module.ts
import { Module } from '@nestjs/common';
import { AppController } from './app.controller';
import { AppService } from './app.service';

@Module({
    controllers: [AppController],
    providers: [AppService],
})
export class AppModule {}Your app.module.ts is the root module of the app that is imported from main.ts, and bootstrapped with NestFactory.create. It imports a controller and a service, the two other building blocks that we’ve discussed earlier. Nest makes them available to the module by using the @Module decorator.
app.controller.ts
import { Controller, Get } from '@nestjs/common';
import { AppService } from './app.service';

@Controller()
export class AppController {
    constructor(private readonly appService: AppService) {}

    @Get()
    getHello(): string {
        return this.appService.getHello();
    }
}Note that NestJS makes heavy use of decorators. By default, Nest comes with a basic controller that has a single method, which is using a method from app.service.ts. Remember that we’ve said that Nest encourages to hand any business logic from controllers over to services.
app.service.ts
import { Injectable } from '@nestjs/common';

@Injectable()
export class AppService {
    getHello(): string {
        return 'Hello World!';
    }
}Looking at the service, all it does is returning a string that reads “Hello World!”. If you start up your dev server using
npm run start:dev
and visit localhost:3000, then you will see this message displayed. It is coming from this service, that is called from the controller, that is called from your main app module, which is bootstrapped from main.ts.
You will also have an app.controller.spec.ts file with a basic set of test cases to get you started if you want to test your modules.
Creating Your Very First Module
However, we don’t want to work with the built-in modules, we want to create our own stuff. To generate modules, you can use the generate command of Nest’s CLI:
nest generate module cat
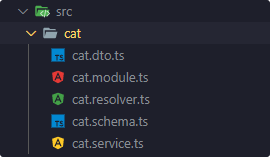
This will generate a new folder for you — called “cat” — under your src folder. It will also create a cat.module.ts for you inside this folder. Extend the generated code with the following:
import { Module } from '@nestjs/common';
import { CatService } from './cat.service';
import { CatResolver } from './cat.resolver';

@Module({
    providers: [CatService, CatResolver],
})
export class CatModule {}We also need a new service, and this time, a resolver instead of a controller. Note that you pass resolvers to the providers array, instead of controllers, like we had for app.module.ts. Luckily for us, the generate command from Nest’s CLI can be used to generate other files as well. Run:
nest generate service cat --no-spec
By specifying the --no-spec flag, you tell NestJS that you don’t want to generate a test file for the service this time. This will generate the following empty boilerplate for you, inside the same cat folder:
import { Injectable } from '@nestjs/common';

@Injectable()
export class CatService {}Notice the naming of the files, and the structure of your project. Every module is separated into a different folder with its own set of controller/resolver and service.
Integrating GraphQL
Now we have our own module, with its own service, but we also need a resolver for handling incoming requests. Of course, to work with GraphQL first, we need to install some dependencies. Namely:
npm i @nestjs/graphql graphql-tools graphql apollo-server-express
This will install four different packages, all needed to make GraphQL work properly with NestJS:
@nestjs/graphql: The GraphQL TypeScript module for Nestgraphql-tools: A handy set of tools for making working with GraphQL easier for usgraphql: The JavaScript implementation of GraphQL itselfapollo-server-express: A GraphQL server for Express
After everything is installed, let’s create that missing resolver. Again, we can use Nest CLI:
nest generate resolver cat --no-spec
To create the simplest query possible, change your cat.resolver.ts in the following way:
import { Resolver, Query } from '@nestjs/graphql';

@Resolver()
export class CatResolver {
    @Query(returns => String)
    async hello() {
        return '👋';
    }
}This will return a single waving emoji if you query for the hello field. Let’s not forget we also need to import the GraphQL module to our app.module.ts, as well as the CatModule that we’ve created earlier:
  import { Module } from '@nestjs/common';
  import { AppController } from './app.controller';
  import { AppService } from './app.service';
+ import { CatModule } from './cat/cat.module';
+ import { GraphQLModule } from '@nestjs/graphql';

@Module({
+     imports: [
+         CatModule,
+         GraphQLModule.forRoot({
+             autoSchemaFile: 'schema.gql'
+         })
+     ],
      controllers: [AppController],
      providers: [AppService],
  })
export class AppModule {}This will get GraphQL working for us. The GraphQL module that we’ve specified as an import can take an object as an argument. Using the code first approach, we can specify an autoSchemaFile property, and pass a string as a value, that specifies the path where we want the schema to be generated for us by the GraphQL module. If you run your app, you will notice a schema.gql appearing at the root of your directory generated by Nest.
The code first approach uses TypeScript classes and decorators to generate a GraphQL schema, while using the schema first approach, you specify your GraphQL schema with SDL schema definition files.
If you are unfamiliar with how GraphQL works, I recommend checking out the article below to get you up and running.
If you open up your localhost at localhost:3000/graphql and query for the hello field, you should get back a waving emoji 👋

Integrating MongoDB
The last step in integrating dependencies is to also integrate MongoDB, so we can persist our data. For this to work, we are going to need to install two more dependencies:
npm i --save @nestjs/mongoose mongoose
As you can see, we are going to use the popular Mongoose package. Once installed, you want to first connect your main module to your MongoDB by adding the MongooseModule to your imports:
import { Module } from '@nestjs/common';
import { AppController } from './app.controller';
import { AppService } from './app.service';
import { CatModule } from './cat/cat.module';
import { GraphQLModule } from '@nestjs/graphql';
import { MongooseModule } from '@nestjs/mongoose';

@Module({
    imports: [
        CatModule,
        GraphQLModule.forRoot({
            autoSchemaFile: 'schema.gql'
        }),
        MongooseModule.forRoot('mongodb://localhost/nest')
    ],
    controllers: [AppController],
    providers: [AppService],
})
export class AppModule {}I’m using a database called nest. Here you can specify an env variable to use a dev server during local development, and a production server when the app is deployed.
Defining a schema
Now to make us able to communicate with the database, we need to define a schema, as in Mongoose, everything starts with a schema. It defines a model that maps to a MongoDB collection. Once more, we can use decorators to create our schema. Put the following schema file inside your cat folder:
import { Prop, Schema, SchemaFactory } from '@nestjs/mongoose';
import { Document } from 'mongoose';

class Characteristics {
    lifespan: string
    size: 'small' | 'medium' | 'large'
    coat: 'short' | 'medium' | 'long'
    color: string
}

@Schema()
export class Cat {
    @Prop()
    breed: string;

    @Prop()
    characteristics: Characteristics;
}

export type CatDocument = Cat & Document;
export const CatSchema = SchemaFactory.createForClass(Cat);Here we export a new CatSchema that is created from the Cat class, and a CatDocument as well to indicate the type of the document. We will have a breed for each cat, and a couple of characteristics associated with them. Alternatively, if you don’t want to use decorators you can define your schema in a simpler way:
export const CatSchema = new mongoose.Schema({
    breed: String,
    characteristics: Characteristics
});To use this new schema inside our cat module, we need to load it through the imports array:
import { Module } from '@nestjs/common';
import { MongooseModule } from '@nestjs/mongoose';
import { CatService } from './cat.service';
import { CatResolver } from './cat.resolver';
import { Cat, CatSchema } from './cat.schema';
@Module({
    imports: [MongooseModule.forFeature([{ name: Cat.name, schema: CatSchema }])],
    providers: [CatService, CatResolver]
})
export class CatModule {}Here we are using the forFeature method of the MongooseModule to configure the schema for the module. Now that we’ve registered the schema, we will need to inject the Cat model into our service, and then use the service inside our resolver to fetch and modify data in our database.
To inject the newly created CatModel into our service, modify your cat.service.ts accordingly:
import { Model } from 'mongoose';
import { Injectable } from '@nestjs/common';
import { InjectModel } from '@nestjs/mongoose';
import { Cat, CatDocument } from './cat.schema';

@Injectable()
export class CatService {
    constructor(@InjectModel(Cat.name) private catModel: Model<CatDocument>) {}

    async findAll(): Promise<Cat[]> {
        return this.catModel.find().exec();
    }
}To inject the model into a service, you can use the @InjectModel decorator. Now we can use this.catModel to execute mongoose queries. I’ve already created an async function that will query all cats using the find method. The return type of this function will be a Promise of cats.
Extending the Resolver
So to actually use this findAll method, let’s go into our cat resolver and create a cats field for GraphQL:
import { Resolver, Query } from '@nestjs/graphql';
import { CatService } from './cat.service';
import { CatType } from './cat.dto';

@Resolver()
export class CatResolver {
    constructor(private readonly catService: CatService) {}

    @Query(returns => [CatType])
    async cats() {
        return this.catService.findAll();
    }
}Using the constructor you can make the service available for the resolver. All we have to do here is define the return type and call the findAll method of the service. You’ll notice that the return CatType is coming from a file called cat.dto. This file will hold the data transfer object that defines how data will be sent over to our API. Create this file and add the following:
import { ObjectType, Field, InputType } from "@nestjs/graphql";

@ObjectType('Characteristics')
@InputType('CharacteristicsInput')
class Characteristics {
    @Field()
    lifespan: string

    @Field()
    size: 'small' | 'medium' | 'large'

    @Field()
    coat: 'short' | 'medium' | 'long'

    @Field()
    color: string
}

@ObjectType('CatType')
@InputType('CatInputType')
export class CatType {
    @Field()
    breed: string;

    @Field()
    characteristics: Characteristics;
}Here we have a couple of new decorators. @ObjectType and @InputType defines what type of data GraphQL will return, and what type of data it will accept when we want to update our cats collection. Since we want the same type for both queries and inputs, we need to use both decorators.
Why we are using classes here instead of interfaces? Classes are part of ES6 which means they will be preserved in the compiled JavaScript, unlike TypeScript interfaces. This is useful for Nest as it can refer to them during runtime. That is why Nest prefers using classes instead of interfaces.
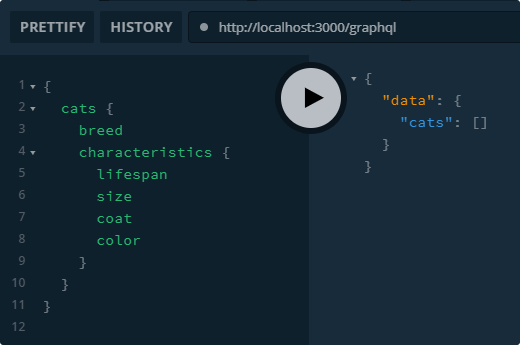
Let’s go back into the GraphQL playground and execute a query. It will return an empty cats array as we haven’t added anything yet to our collection, but at least it returns an empty array which means that everything is working. So to actually create cats, let’s add a new method to our service and a new mutation for our resolver.
Creating cats
Starting from the service, add the following create method that we will call from the resolver:
async create(createCatDto: CatType): Promise<Cat> {
    const createdCat = new this.catModel(createCatDto);
    return createdCat.save();
}When we call this method, it will create a new document in our collection using CatType as a data transfer object. Based on this, we can add a new method to the resolver that calls this function:
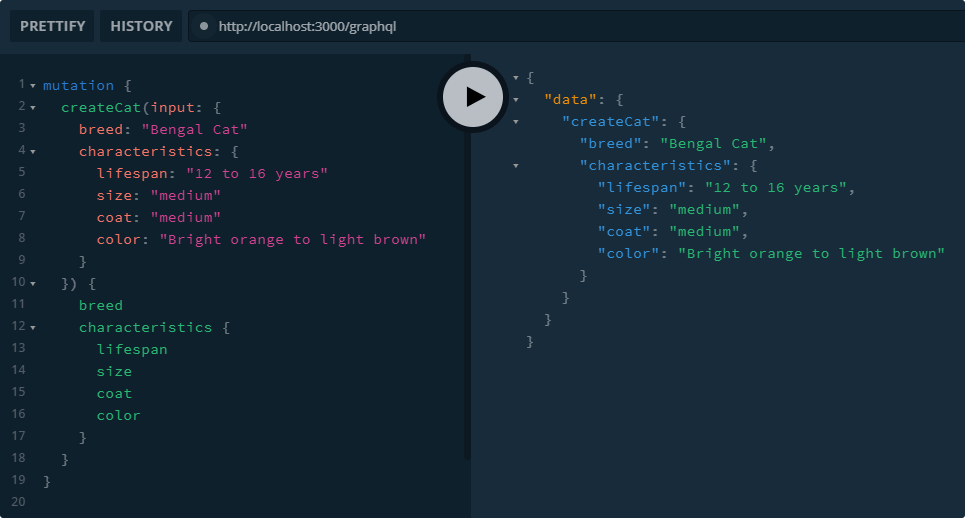
@Mutation(returns => CatType)
    async createCat(@Args('input') input: CatType) {
        return this.catService.create(input);
}This time, we want to use the @Mutation decorator to let Nest know we want this method to be a mutation. And to pass arguments to it, we need to use the @Args decorator. GraphQL will expect this to be a CatType as well. Let’s go back to the playground and try to create a new cat in our database using this mutation.
Updating cats
There are two more things left to do to call our CRUD API complete: updating and removing cats. Let’s go with the first one. We already have most of the code for it, we just need to do some copy-pasting and a little update here and there:
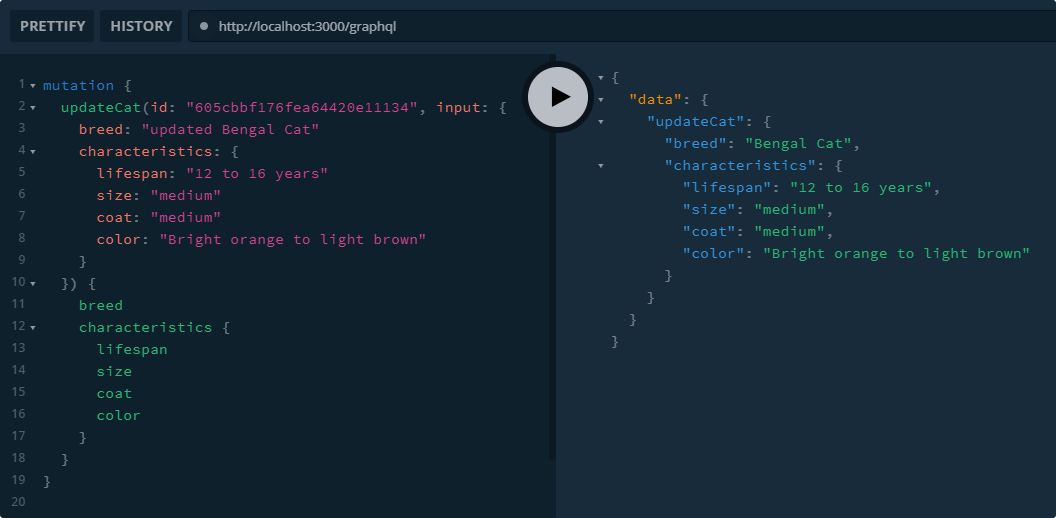
async update(id: string, updateCatDto: CatType): Promise<Cat> {
    return this.catModel.findByIdAndUpdate(id, updateCatDto);
}We need one more method for the service. This time, we will need to pass it an id as an argument to identify which document we want to update. Using the findByIdAndUpdate method of Mongoose, we can pass this id as well as the updated data to update our cats.
@Mutation(returns => CatType)
async updateCat(@Args('id') id: string, @Args('input') input: CatType) {
    return this.catService.update(id, input);
}And of course, we need one more method for the resolver, which calls this service method. The only difference is that we need two arguments this time. Let’s try out this one in our playground:
Removing cats
All that is left to do is to get rid of breeds that we deem unnecessary. You know how it goes by now; we need a new method for our service:
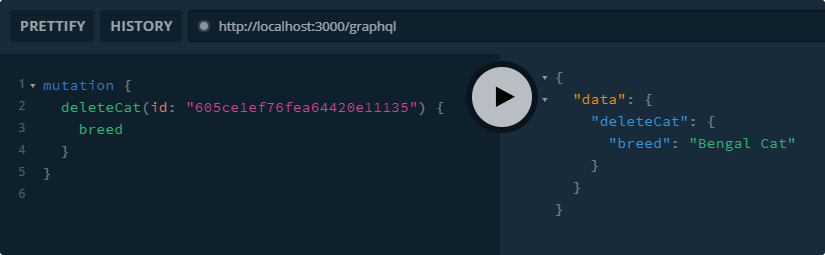
async delete(id: string): Promise<Cat> {
    return this.catModel.findByIdAndDelete(id);
}and a new method for the resolver from which we can call this service:
@Mutation(returns => CatType)
async deleteCat(@Args('id') id: string) {
    return this.catService.delete(id);
}And let’s give this one a try as well. Whatever you will query for, that field of the removed document will be returned.
Summary
Now you have a fully working CRUD API in NestJS + GraphQL connected to MongoDB. For simple applications, this may seem like unnecessarily too much code, and it is. But as your application grows, your modules will be kept simple. Everything is in a new class, and well separated from the rest of the others. This also makes testing your NestJS application much easier.
If you would like to get the code in one piece, you can clone it from GitHub. Have you worked with Nest before? What are your impressions? Let us know in the comments below! Thank you for reading through, happy coding!

Rocket Launch Your Career
Speed up your learning progress with our mentorship program. Join as a mentee to unlock the full potential of Webtips and get a personalized learning experience by experts to master the following frontend technologies:
Courses


Recommended
Generic React Components with TypeScript

How to Get Started With React + JSON Server