Understanding The Critical Rendering Path in 5 Minutes
Ever wondered what is actually going behind the scenes when your browser displays a website for you? What it actually takes to render everything you see here? The image above, the words you’re reading? — If so, you are in the right place. This article is going to walk you through the path of the critical rendering or CRP for short.
To understand the process, first, we need to understand the meaning and what better way to do that than to clarify the definition.

The Critical Rendering Path
The Critical Rendering Path is the sequence of steps the browser takes between receiving resources such as HTML, CSS, and JavaScript to turn them into pixels you see on your screen right now.
It consists of five different steps, each building on top of the preceding one. Starting from building the dom once the browser receives the HTML file from the server.
#1: Constructing the Document Object Model (DOM)
After receiving the HTML file, the browser needs to parse it to construct the dom, which serves as a programming API. Any further operation is done using the DOM. Think of getting an element through JavaScript. You don’t interact with the HTML file itself, you get a DOM element back.
Constructing the DOM is made of its own steps:
- First, the browser reads in the bytes returned from usually a server. Once that is ready, conversion can begin.
- The bytes are turned into human-readable characters based on the encoding. This is usually set to UTF-8. So far, we have a readable HTML file, that essentially is a long string.
- From here, the browser starts creating tokens from the converted file. Each element will be its own token with its own set of rules;
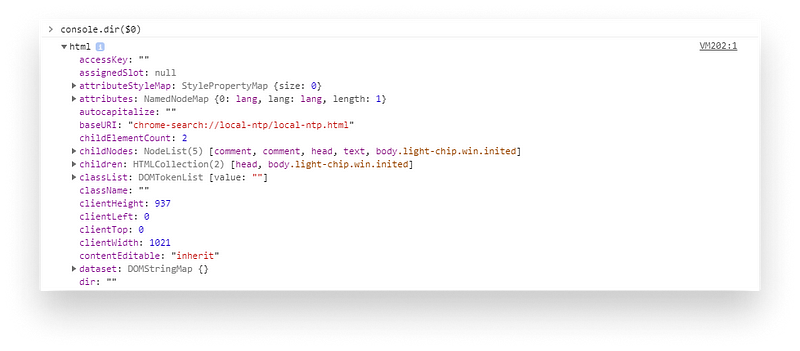
<html>,<head>or<body>will all be separate tokens. - Once we have the tokens, the browser can start creating the individual nodes from them. This step is also called lexing: Each object get their own properties. By now, each element will be an object. Logging out the HTML element will return all of its properties. (See image below)
- All that’s left to do, is to link the created objects together. Since we have relationships between tags in HTML — as a last step — the browser links them together into a tree structure, that also holds the parent-child relationship between elements.
The final output of the above steps will be the document object model.

#2: Constructing the CSS Object Model (CSSOM)
During the construction of the dom, the browser comes across a link tag that holds a reference to an external stylesheet. It sends a request to fetch the resource, which comes back just like the HTML file; containing only strings of bytes.
As with HTML, the strings of bytes need to be converted into something a browser can understand. So the steps that created the dom are repeated again, but for CSS this time.
Bytes are turned into readable characters based on the encoding. Tokens can be created from them, that are turned into nodes. Nodes can be linked together again into a tree structure that will be the object model for CSS.

#3: Constructing the Render Tree
Now that we have both DOM and CSSOM ready, we can move onto the third step which is creating the render tree. Don’t panic, it sounds more complicated than it is.
Currently, all we have are the DOM and CSSOM separately, living in completely different dimensions. In this step, the browser combines them to later know what to render and where. We have each element ready, but we don’t have the styles linked for them. This is what this step is all about.
So starting from the root of the tree, the browser traverses through each visible element. We don’t care about invisible ones, since they won’t be rendered anyway. The render tree only contains visible nodes that are required for rendering. Tags that only contain information about the document like meta tags or tags that are hidden from CSS are omitted therefore.
We are left with visible nodes. The next step is to find the matching CSS rules and apply them to the element. This way, we will have both the content and their computed styles.
This is the output of this step; All visible nodes available with their content and style information, which are needed to render them on the screen eventually.
#4: Calculating Layout
Proceeding to the next step, we are one step closer to see actual content on our page. Now we have each element with their computed styles, which means we can calculate their position on the screen. This is the layout stage. It is also often called as reflow.
To calculate the exact size and position of each element, the browser starts at the root of the render tree and traverses it. The output of the process will be the Box Model, which exactly tells the browser each element’s position and their size.
Knowing everything we need — from content to styles — including even geometry, there’s nothing stopping us from rendering pixels, so we can proceed to the final stage.

#5: Painting
Until now, the browser only did calculations but nothing appears on the screen. This is what the last step is intended for; Rendering each and every pixel to the screen, so now we have actual words to read. 🎉
These processes and calculations are usually happening so fast that we are not even aware of them. Yet the heavier we make the site, the slower it gets as we are creating more work for the browser.
Having a deeper knowledge of the steps mentioned above means we can make significant improvements to our site in terms of performance. The faster we make the intermediate steps between receiving our resources, the faster our users will see content on our page.
And with everything in place, we can now answer the eternal question:
What costs more? Repaint or Reflow? 🤔
Now that we know how the critical rendering path works, we also know the difference between repaint and reflow; Repaint occurs when changes are made to an element’s appearance that does not affect its layout, while reflow — also known as layout — happens when the changes affect an element’s layout, eg.: changing its height, width or position.
Check out CSS Triggers to know which property triggers which phase
We also know that the steps are sequential and repaint comes after reflow, meaning the one that’s higher in the hierarchy, the more critical it is.
Since reflow precedes repaint, we can conclude that reflow is more critical, because it also triggers a repaint. ⏳

Rocket Launch Your Career
Speed up your learning progress with our mentorship program. Join as a mentee to unlock the full potential of Webtips and get a personalized learning experience by experts to master the following frontend technologies:
Courses


Recommended
Making a Jumping Box Animation Using Only CSS

Zero Configure your React-Typescript App With Parcel
Ferenc Almasi •